www.it-connect.fr
Windows 11 compatibility : audit your computers with PowerShell
Table of Contents
I. Introduction
For many companies, the migration from Windows 10 to Windows 11 is one of the major projects of this year 2025. This upgrade, which can be carried out using a variety of technical solutions, also involves an audit phase. This will enable us to determine which machines in the installed base are compatible with Windows 11, and which are not.
Fleet management or mobile device management solutions, such as GLPI and Microsoft Intune, can help with this assessment, thanks to their inventory functionality. For those who don't have a suitable solution, how do you go about it?
Microsoft offers a tool called "PC Health Check", but it has to be run on each workstation manually, which is not suitable for a computer park of tens, hundreds or thousands of machines. In this article, I propose an approach based on running a PowerShell script and centralizing the results in the Active Directory.
The idea is simple: for each machine, indicate whether or not it complies with Windows 11 prerequisites, within the corresponding Active Directory object. A second script is then run to generate an audit report.
II. Using PowerShell to determine compatibility with Windows 11
The PowerShell script needs to check a number of items on the workstation to determine whether it is ready for Windows 11 or not. In particular, you should look closely at the following items:
- Processor: 1 GHz or faster with at least 2 cores. 64-bit compatible processor (or ARM)
- Memory (RAM): 4 GB or more.
- Storage: 64 GB or more.
- System firmware: UEFI, Secure Boot compatible.
- TPM: version 2.0.
- Graphics card: compatible with DirectX 12 or later with WDDM 2.0 driver.
Microsoft offers a ready-to-use PowerShell script that you can run to find out whether or not a machine is compatible with Windows 11. You can download it here:
You can run it on a machine, as administrator, to obtain the result. The advantage of this script is that it indicates the exact result of each test performed.
.HardwareReadiness.ps1
Note : HardwareReadiness.ps1 is a signed script, which explains the signature at the end of the file. However, it has expired, as the certificate used by Microsoft has been invalid since September 2022.
B. Adapting the script: centralizing results in AD
This script is a good base and does most of the work. The drawback is that it returns a result in the console, which means you have to be in front of the machine to read the result. This is not what we want.
Note : this script can be run remotely using the WinRM protocol. However, this requires the machine to be online at the time of interrogation, and above all, Remote Management must be enabled on Windows (which is not the default on Windows 10).
We're going to modify this PowerShell script so that the information is passed on to the Active Directory. By default, each Active Directory machine has permissions to modify the attributes of the corresponding object. We're going to take advantage of this opportunity to store the test results in the Active Directory.
Our goal is to move up in the info attribute of each computer object. We could choose another attribute, but this one is generally free, unlike the description which is often used.
We're not going to use the commands of the ActiveDirectory PowerShell module, to avoid having to install it on remote machines. Instead, we're going to use native components supported by all machines running Windows 10.
Start by editing the PowerShell script to modify line 490 in order to store in a variable $Result the result of the :
$Result = $outObject | ConvertTo-Json -CompressThen, following the line mentioned above (but before the signature), enter this piece of code:
$ComputerName = $env:COMPUTERNAME
$ADSearch = New-Object DirectoryServices.DirectorySearcher
$ADSearch.SearchRoot = "LDAP://DC=IT-CONNECT,DC=LOCAL"
$ADSearch.Filter = "(&(objectCategory=Computer)(CN=$ComputerName))"
$ADComputerObj = [ADSI]$ADSearch.FindOne().Path

if($ADComputerObj -ne $null){
  $ADComputerObj.Put( "Info", $Result )
  $ADComputerObj.SetInfo()
}
Here, in order, are the meanings of these commands:
- Retrieve local computer name.
- Create an Active Directory search object.
- Define the LDAP root to search.
- Create an LDAP filter to retrieve only the object corresponding to the current computer.
- Search for the computer with an LDAP query.
- Change the value of the
Infocomputer attribute (if the computer has been found upstream) - Save changes in Active Directory.
We will register this new version under the name ADHardwareReadiness.ps1.
III. Compatibility with Windows 11: an analysis at the scale of a computer park
A. Run the PowerShell script with a GPO
The PowerShell script will be launched on machines from a Group Policy (GPO). It will be launched when the Windows machine starts up. We'll make sure to target only machines running Windows 10, thanks to a WMI filter. Machines already running Windows 11 will not be included in our analysis.
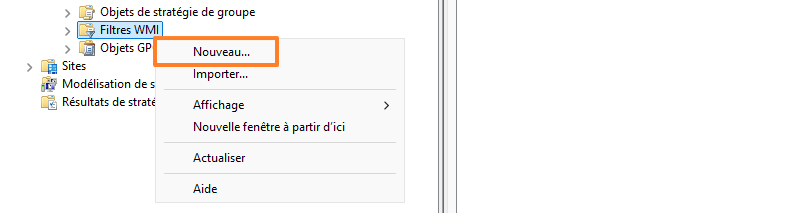
From the GPO management console, create a new WMI filter. Using a query, it will apply the GPO only to Windows 10 machines, even if the targeted OU contains Windows 11 machines. This will probably be your case... At least, it's mine with the OU PC which will be targeted (GPO binding).
Enter a name and description (1), then click on the "Add" button (2). Enter this as the WMI query value (3), then confirm (4):
SELECT * FROM Win32_OperatingSystem WHERE Version LIKE "10.%" AND ProductType = 1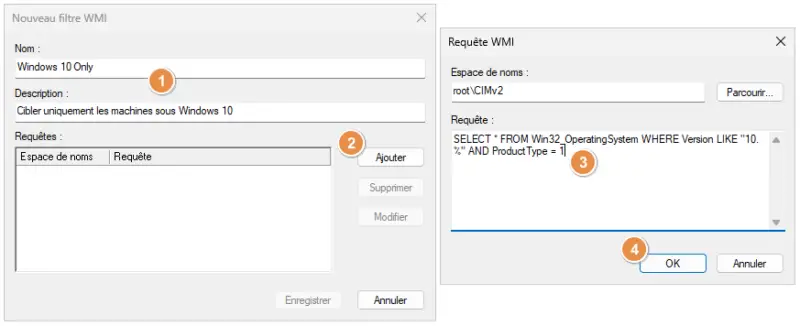
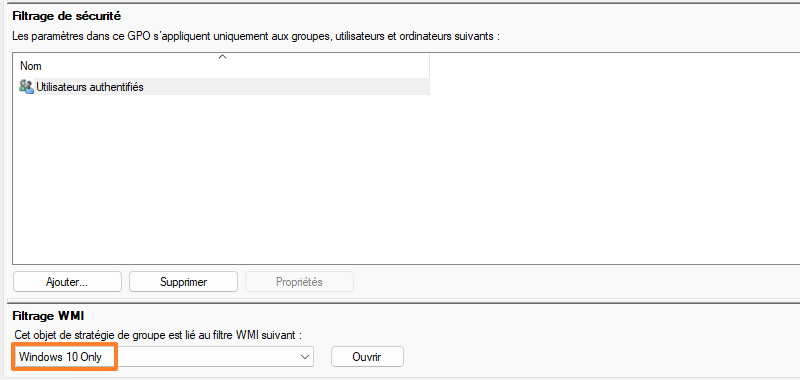
Confirm. Create a new GPO and start by associating it with the WMI filter created earlier.
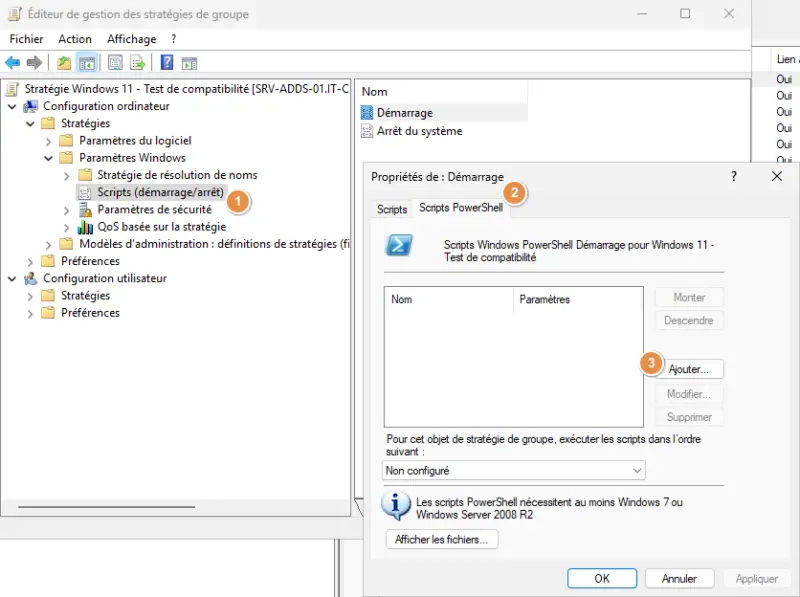
Next, edit the Group Policy to configure it. As a reminder, the PowerShell script must be run at machine startup. Browse the settings as follows:
- Computer configuration > Strategies > Windows settings > Scripts (startup/shutdown) > Startup
Switch to the "PowerShell" tab and click on the "Add" button.
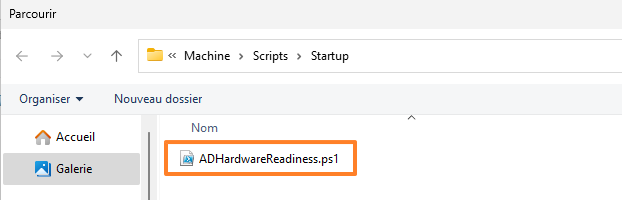
You then need to copy and paste your PowerShell script into the exposed directory, or fetch it from elsewhere (from Netlogon, for example).
Your GPO is now ready! All you have to do is link it to one or more OUs, depending on your needs (remember to test first!). Go to a Windows 10 machine for a test: run a gpupdate /force then reboot. The rest takes place in the AD...
B. Overview of results in Active Directory
We'll start with a visual check. Open the Active Directory Users and Computers console, then access the properties of the computer object corresponding to the test machine (remember to enable the display of advanced features upstream).
Go to the "Attribute Editor" tab. Then search for the attribute info in the list. The attribute has been updated!
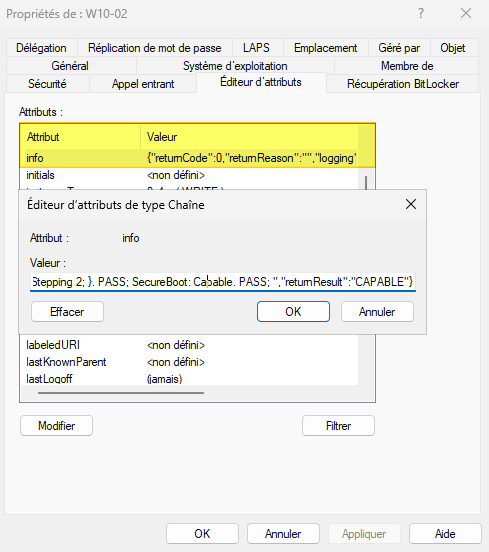
In concrete terms, we have a complete string in this attribute in the form :
{"returnCode":1,"returnReason":"Storage, TPM, ","logging":"Storage: OSDiskSize=63GB. FAIL; Memory: System_Memory=4GB. PASS; TPM: TPMVersion=False. FAIL; Processor: {AddressWidth=64; MaxClockSpeed=3992; NumberOfLogicalCores=2; Manufacturer=AuthenticAMD; Caption=AMD64 Family 25 Model 117 Stepping 2; }. PASS; SecureBoot: Capable. PASS; ","returnResult":"NOT CAPABLE"}We could run the command below to display the name and test result for each Windows 10 machine registered in the AD.
Get-ADComputer -Filter {OperatingSystem -like "Windows 10*"} -Property OperatingSystem, Info | Format-Table Name, InfoThe format of the string in the info might ring a bell? No, don't you think? The JSON format! That's because we use the ConvertTo-Json at the end of the script. The good news is that PowerShell can read JSON very well. This is what we're going to exploit in the next part of this article, dedicated to reporting.
C. Compatibility with SecureBoot
When I ran several tests with this script, I realized that compatibility with SecureBoot wasn't always correct. In fact, the PowerShell command Confirm-SecureBootUEFI does not seem to appreciate running as SYSTEM via a GPO.
As a result, we get this type of result in AD :
{"returnCode":-1,"returnReason":"","logging":"Storage: OSDiskSize=126GB. PASS; Memory: System_Memory=4GB. PASS; TPM: TPMVersion=2.0, 0, 1.16. PASS; Processor: {AddressWidth=64; MaxClockSpeed=3992; NumberOfLogicalCores=2; Manufacturer=AuthenticAMD; Caption=AMD64 Family 25 Model 117 Stepping 2; }. PASS; SecureBoot: Undetermined. UNDETERMINED; UnauthorizedAccessException Impossible de définir les privilèges nécessaires. Accès refusé.; ","returnResult":"UNDETERMINED"}This is a pity, as this command has the advantage of returning a precise status : SecureBoot available and enabled, SecureBoot available and disabled, and SecureBoot not supported. To get around this problem, the ADHardwareReadiness.ps1 has been modified to adapt the SecureBoot test to a Windows Registry-based method (from line 431).
The following code has been integrated in place of the original (download link at bottom of page):
# SecureBoot
$SecureBootKey = "HKLM:\SYSTEM\CurrentControlSet\Control\SecureBoot\State"
try {
    $isSecureBootEnabled = (Get-ItemProperty -Path $SecureBootKey -Name "UEFISecureBootEnabled" -ErrorAction Stop).UEFISecureBootEnabled

    if($isSecureBootEnabled -eq 1){
        $outObject.logging += $logFormatWithBlob -f $SECUREBOOT_STRING, $CAPABLE_STRING, $PASS_STRING
        UpdateReturnCode -ReturnCode 0
    }else{
        UpdateReturnCode -ReturnCode 1
        $outObject.returnReason += $logFormatReturnReason -f $SECUREBOOT_STRING
        $outObject.logging += $logFormatWithBlob -f $SECUREBOOT_STRING, $NOT_CAPABLE_STRING, $FAIL_STRING
        $exitCode = 1
    }
}
catch {
    UpdateReturnCode -ReturnCode -1
    $outObject.logging += $logFormatWithBlob -f $SECUREBOOT_STRING, $UNDETERMINED_STRING, $UNDETERMINED_CAPS_STRING
    $outObject.logging += $logFormatException -f "$($_.Exception.GetType().Name) $($_.Exception.Message)"
    $exitCode = 1
}
Following this modification, the information now flows correctly! Now we can move on to the reporting phase.
Note : running the
Confirm-SecureBootUEFIcommand through PsExec works, which may be an avenue worth exploring, but implies running this tool on the workstations to be audited.
D. Creating a report
Finally, still using PowerShell, we'll read the information contained in the attribute info Windows 10 machines to generate a comprehensive report. Very quickly, you can :
- See the percentage of your installed base that is compatible with Windows 11
- See the main reasons when an incompatibility is detected
- Get a precise status for each computer with the summary table
Below is an overview of the report.

This script, which you can find on our GitHub page, uses the PSWriteHtml module to generate the HTML report. You can modify it to suit your needs.
<#
.SYNOPSIS
    This script analyzes the “info” attribute of Windows 10 computers in the Active Directory, to generate a Windows 11 compatibility report.

.DESCRIPTION
    This script helps you get an overall view of the Windows 11 compatibility of a set of computers, thanks to an HTML report comprising several graphs.

.AUTHOR
    Florian Burnel - IT-Connect.fr

.VERSION
    1.0 - Initial version.

.NOTES
    Filename: Get-ADHardwareReadinessReport.ps1
    Creation Date: 2025/02/18
#>

# Get a list of Windows 10 computers in the Active Directory
$ADComputersWin10 = Get-ADComputer -Filter {OperatingSystem -like "Windows 10*"} -Property OperatingSystem, Info | Sort-Object Name


# Get the list of Windows 10 computers and the result of the compatibility test
$ComputersW11Readiness = $ADComputersWin10 | Select-Object Name, @{
                                                    Name="Result";
                                                    Expression={
                                                        $JsonObject = $_.Info | ConvertFrom-Json
                                                        if ($JsonObject.returnResult -ne $null){ $JsonObject.returnResult }else{ "EMPTY" }
                                                    }
                                                }, @{
                                                    Name="Reason";
                                                    Expression={
                                                        $JsonObject = $_.Info | ConvertFrom-Json
                                                        if($JsonObject.returnReason -ne $null){ ($JsonObject.returnReason).TrimEnd(", ") }else{ "" }
                                                    }
                                                }

# Counting by status
$ComputersW11ReadinessStats = $ComputersW11Readiness | Group-Object -Property Result | Sort-Object Count -Descending


# Counting occurrences of different reasons
$ReasonCounts = @{}

$ComputersW11Readiness | ForEach-Object {
    $Reasons = $_.Reason -split ", "
    foreach ($Reason in $Reasons) {
        if (-not [string]::IsNullOrWhiteSpace($Reason)) {
            if ($ReasonCounts.ContainsKey($Reason)) {
                $ReasonCounts[$Reason]++
            } else {
                $ReasonCounts[$Reason] = 1
            }
        }
    }
}

# HTML report construction with PSWriteHTML
New-HTML -Title "Compatibility of computers with Windows 11" -FilePath "C:\Scripts\HTML\Rapport-Windows-11-Readiness.html" -ShowHTML:$true {

    # Report header with domain name and date
    New-HTMLHeader {
        New-HTMLSection -Invisible  {
            New-HTMLPanel -Invisible {
                New-HTMLText -Text "Domain : $($env:USERDNSDOMAIN)" -FontSize 18 -FontWeight 100
                New-HTMLText -Text "Date : $(Get-Date -Format "dd/MM/yyyy")" -FontSize 12
            } -AlignContentText left
        }
    }

    # Section 1 - Graphs
    New-HTMLSection -HeaderText "Compatibility with Windows 11" -HeaderBackGroundColor "#00698e" {
        New-HTMLChart -Title "Compatibility of all IT assets" -Gradient {
            foreach ($Line in $ComputersW11ReadinessStats) {
                New-ChartDonut -Name  $Line.Name -Value $Line.Count
            }
        }

        New-HTMLChart -Title "Reasons for incompatibility" -Gradient {
            foreach ($Reason in $ReasonCounts.Keys) {
                New-ChartDonut -Name $Reason -Value $ReasonCounts[$Reason]
            }
        }
    }

    # Section 2 - Computer list tables
    New-HTMLSection -HeaderText "Results of computer compatibility tests" -HeaderBackGroundColor "#00698e"  {
            New-HTMLPanel {
                New-HTMLTable -DataTable $ComputersW11Readiness -HideFooter -AutoSize
            }
    }
}
IV. Conclusion
Thanks to these two scripts, you have a simple and effective method for assessing the compatibility of your IT assets with Windows 11. Based on an Active Directory domain, this approach automates the auditing of machines, enabling you to quickly check whether they meet the required criteria, including TPM (a major stumbling block in many cases).
Whether you're planning a planned upgrade or a gradual migration, these scripts give you a clear view of the status of your workstations. They help you prepare your Windows 11 migration project.
Here are the links to download the scripts.
- ADHardwareReadiness.ps1 - To be executed by GPO

- Get-ADHardwareReadinessReport.ps1 - To generate the report
If you have any questions or ideas for improving these scripts, feel free to comment on this article or push a modification on GitHub.