Robocopy : copy, backup and synchronize data under Windows
Table of Contents
I. Introduction
This tutorial will guide you through the basics of using Robocopy on Windows, explaining various use cases and providing practical examples. This command-line tool is a nugget available on Windows!
Integrated into Windows and accessible from the command line, Robocopy, or "Robust File Copy", is designed to facilitate efficient, reliable copying of files and directories. It is particularly appreciated by system administrators for its advanced features, such as mirroring, interrupt recovery and file attribute management.
Robocopy has been natively added to the Windows operating system since Windows Vista, and is still available on Windows 11 and Windows Server 2025. Significantly more powerful than DOS commands copy and xcopyand offers an alternative to PowerShell, especially for BITS-based methods.
II. Robocopy use cases
Robocopy is a highly reliable tool with a wide range of options, making it an interesting ally when it comes to copying, synchronizing and migrating data. Unless you're afraid of the command line, it's well worth getting to know this tool.
There are a number of possible uses:
- Copying large files
- Create a data backup
- Synchronize data between two machines
- Mirroring files
Personally, I've already used it several times to copy files between two servers, notably for file server migration projects. Mirroring replicates data from server A to server B, in a differential manner. On the day of migration, all that's required is to synchronize the latest modified, added or deleted data.
Note : Robocopy is able to copy NTFS permissions and file and folder attributes.
Mirror mode works like this: if a file is deleted in the source, it will also be deleted in the destination. This is useful for synchronizing folders between different locations.
III. Getting to grips with Robocopy with examples
A. Basic syntax
The basic syntax of Robocopy is as follows:
robocopy <Source> <Destination>You can also specify options, although these are optional:
robocopy <Source> <Destination> <Files> <Options><Source>The path to the source directory.<Destination>The path to the destination directory.<Files>Files to copy (optional filter).[<Options>]Ordering options.
Robocopy offers a number of particularly useful options:
/S- Copy all sub-directories of the tree, except empty directories./E- Copy all subdirectories in the tree, including empty ones./MIR- Copy with mirror mode./SEC- Copy permissions from source to destination./COPYALL- Copy all file attributes (creation date, modification date, etc.)./Z- Copy files in restart mode, i.e. in the event of an interruption, Robocopy can pick up where it left off instead of copying the entire file./ZB- Use restart mode. If access is denied, use backup mode./R:5- Retry 5 times if unsuccessful (the default value is 1 million, so it's important to customize this option)./W:5- Wait 5 seconds between each test (default: 30 seconds)./NP- Does not display the percentage copied./V- Verbose mode for more detailed output, including ignored files./MT:16- Make multi-threaded copies, with 16 threads in this example (default: 8 - maximum: 128)./LOG- Specify the path to a log file
B. Copy data between source and destination
Let's start with a simple example. We're going to copy all the files in a source directory to a destination directory. This can be a local or remote directory.
We need to open a Command Prompt or PowerShell console to execute the following command:
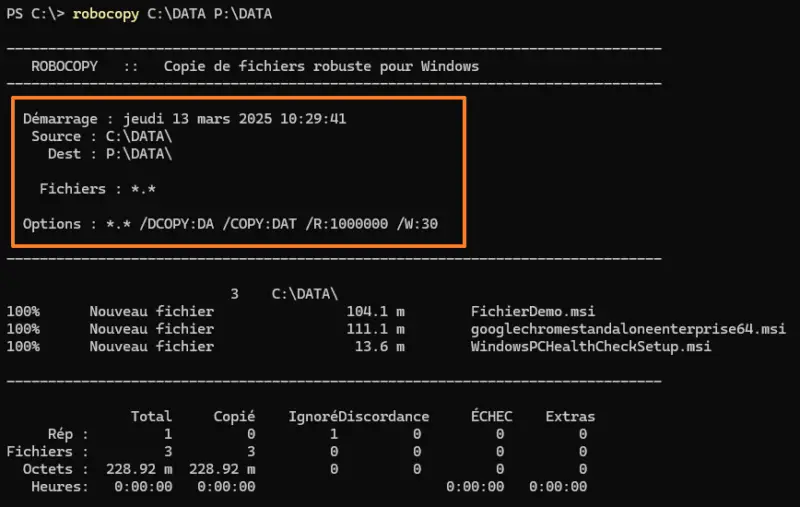
robocopy C:\DATA P:\DATAThis command will copy the data from C:\DATA to P:\DATA. If you specify a source or destination with spaces in the path, remember to enclose the value in quotation marks. The command output displays a summary of the operation, making it easy to see if there were any errors.
In addition, it's worth taking a look at the boxed area in the image below. It indicates the properties of the operation to be performed, with source, destination, targeted files ( *.* means all files) and options. In this way, you can see the default options used by the tool.
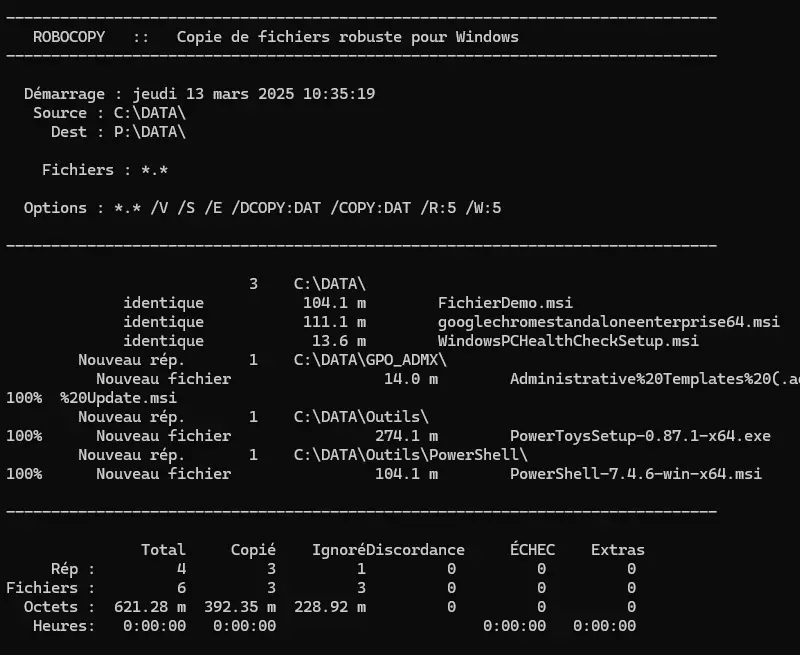
The command we've just run copies only top-level files: it ignores sub-directories and their data. So, if we want to copy the C:\DATA in its entirety, we need to adapt the order :
robocopy C:\DATA P:\DATA /E /R:5 /W:5 /DCOPY:DAT /VThis time, Robocopy will copy all data between source and destination. Several options were used:
/E- Copy all subdirectories in the tree, including empty ones./R:5- Retry 5 times if unsuccessful./W:5- Wait 5 seconds between each trial./DCOPY:DATCopy folder timestamps between source and destination./V- Activate verbose mode.
This time, Robocopy copied the missing data, and also ignored the files already copied the first time.
With this syntax, you can efficiently copy data between a source and a destination.
If you wish to preserve NTFS permissions between source and destination, add the option /SECoption, otherwise this will not be the case.
robocopy C:\DATA P:\DATA /E /R:5 /W:5 /DCOPY:DAT /V /SECYou can also use Robocopy to make a network copy, by specifying UNC paths. For example, from C:\DATA on the local server to the \\srv-fichiers-01.it-connect.local\DATA.
robocopy C:DATA \srv-fichiers-01.it-connect.localDATA /E /R:5 /W:5 /DCOPY:DAT /V /SECNote : by default, Robocopy supports file paths longer than 256 characters. This support can be disabled via the /256 option.
C. Robocopy mirror mode
Robocopy's mirror mode is very powerful, as it allows you to create a mirror between a source and a destination. However, it should be handled with particular care: if you reverse the source and modification, you risk purging the source folder (and thus losing your data).
The /MIR of Robocopy is in fact the combined use of the /E and /PURGE. You can go back to the previous example and simply replace /E by /MIR.
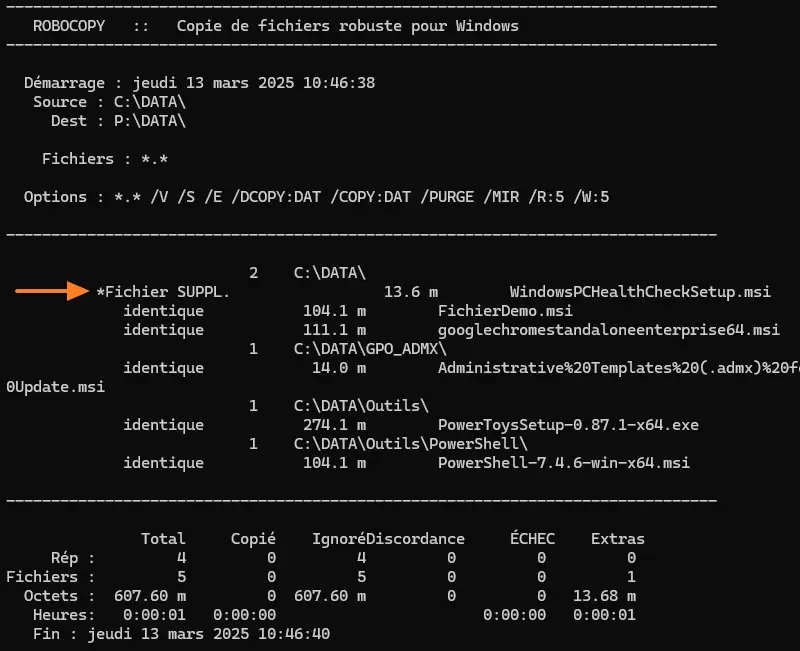
robocopy C:\DATA P:\DATA /MIR /R:5 /W:5 /DCOPY:DAT /VIn this way, Robocopy will copy data from the source to the destination and keep both identical on each run. If you delete a directory or file in the source and restart Robocopy, it will delete it in the destination.
The example below shows that a file has been deleted.
For an even more efficient operation and to get the result as close as possible to the source, it may be wise to add the options /SEC and /COPYALL. In addition, and relevant for large-scale processing, you can activate multithreaded mode to improve performance via the option /MT:16 (here, 16 threads).
D. Generate a log file
Robocopy can handle heavy data copying and synchronization tasks that can last for hours. As a result, you won't necessarily be sitting in front of it, watching it... It may be a good idea to generate a log file.
The tool will log all its activity in this log file. Here is the option /LOG to create this file, while specifying its name.
robocopy C:\DATA P:\DATA /MIR /R:5 /W:5 /DCOPY:DAT /LOG:C:\robocopy.logThere's also the /LOG+ to write after an existing log file, without overwriting it.
E. File filter
By default, Robocopy applies the *.* on files, so it copies all files applying the defined options. You can adjust this behavior to copy only certain files, or conversely, to exclude certain files. Here are some examples of filters you can apply.
- Include files with a specific extension
The example below will include all files with the extension .msi. All other files will be ignored.
robocopy C:\DATA P:\DATA *.msi
robocopy C:\DATA P:\DATA *.msi /E /R:5 /W:5 /DCOPY:DAT
You can include several :
robocopy C:\DATA P:\DATA *.msi *.txt- Exclude files with a specific extension
The example below will exclude all files with the extension .msi. All other files will be copied.
robocopy C:\DATA P:\DATA /XF *.msi
robocopy C:\DATA P:\DATA /XF *.msi /E /R:5 /W:5 /DCOPY:DAT- Exclude a specific directory
The /XF is used to exclude files, while the /XD applies to folders. Thus, we could exclude one or more directories in this way:
robocopy C:\DATA P:\DATA /XD Outils
robocopy C:\DATA P:\DATA /XD Outils /E /R:5 /W:5 /DCOPY:DAT
Here, the directory named Outils will be excluded from the copy. You can also specify the full path of the directory to be excluded, which is preferable to avoid unexpected behavior.
F. Moving data with Robocopy
Robocopy is capable of moving data around, just as we might do with cut-and-paste. To do this, we have two options at our disposal:
/MOVmoves only files/MOVEMove files and folders
During an operation of this type, Robocopy will copy the data from the source to the destination, then delete it from the source. Here's an example in which the /MOVE is integrated :
robocopy C:\DATA P:\DATA /E /R:5 /W:5 /DCOPY:DAT /MOVEG. Robocopy Backup mode
Copy, move, synchronize... and save! Robocopy is definitely a versatile tool, and the optional /B is there to prove it. This option makes a copy in backup mode. So, what's the difference? This option affects the privileges used by Robocopy, which will be useful if your user doesn't have permissions on all the directories to be copied.
All you have to do is add your user account to the"Backup operators" group, and it will be able to enjoy additional privileges in backup mode. If you run Robocopy in administrator mode, you won't have this problem.
robocopy C:\DATA P:\DATA /E /R:5 /W:5 /DCOPY:DAT /BLast but not least, Robocopy offers many more options, including the ability to refine filters on files to be copied (by size, attribute, etc.). Help is available via this command or on the Microsoft website.
robocopy /?IV. Conclusion
Even today, Robocopy remains a relevant tool for system administrators to make file copies under Windows, whether locally or between two machines via the network. Robocopy's advanced features and numerous options make it an invaluable tool. No PowerShell or other Windows command goes as far as Robocopy in copying and synchronizing data.
I encourage you to run tests on small batches of data to practice and find the right options to use. You can, of course, use the examples given in this article, but that doesn't cover every need, as there are so many possibilities.
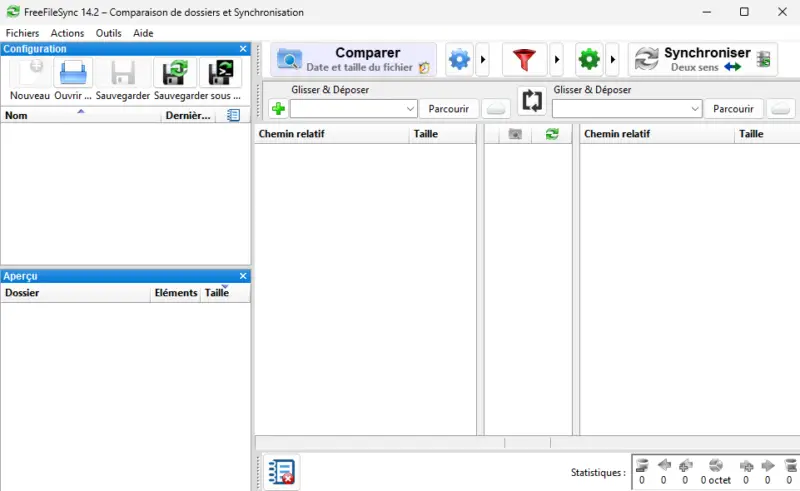
Finally, if you prefer graphical interfaces, there's the FreeFileSync tool: free and open source. It's been around for several years and works very well. I've also had to migrate file servers using this tool, which represents a good alternative to Robocopy in some cases.