Netsh: An Essential Tool for Network Configuration and Diagnosis in Windows
Table of Contents
I. Introduction
Have you ever tried to configure or troubleshoot your Windows network without using the graphical user interface? If so, you're probably familiar with Netsh, a timeless command-line tool despite the existence of PowerShell.
Present in Microsoft operating systems since Windows 2000, Netsh enables system administrators and users to manage the network. Typical scenarios include IP configuration, network card management, firewall administration and wireless connection configuration.
The aim of this guide is to provide you with a list of useful Netsh-based commands for a multitude of tasks. To make the article easier to read, the examples of Netsh use have been organized into several categories.
II. Netsh - Configuring network interfaces
This first part of the article focuses on configuring network interfaces with Netsh. All commands are executed in a Command Prompt or PowerShell console. You must have "admin" rights to modify the system configuration (as with the graphical interface).
A. Display network interfaces
Let's start by looking at how to list all the network interfaces available on your Windows machine. This can be useful for quickly identifying active or inactive interfaces.
netsh interface ipv4 show interfacesThis command displays a list of IPv4 network interfaces with details such as status, type and index.
Here's an example:

B. Configuring a static IP address
If you want to set up a static IP address for a network interface, and no longer use DHCP, you can do so with Netsh.
In this example, we assign the IP address 192.168.14.128 with subnet mask 255.255.255.0 and default gateway 192.168.14.2. In addition to adapting the IP address and mask, replace Ethernet0 by the name of your network interface (the previous command may help you identify the name).
netsh interface ipv4 set address name="Ethernet0" static 192.168.14.128 255.255.255.0 192.168.14.2This command does not return any results in the console when it is executed successfully. The presence of the keyword static is important, bearing in mind that this corresponds to the option named sourcewhich could result in source=static in terms of writing.
C. Configure DNS servers
The previous command does not set the DNS server on the network interface. An additional command must therefore be run to perform this task.
In this example, we set the primary DNS server to 8.8.8.8 and add a secondary DNS server 8.8.4.4.
netsh interface ipv4 set dns name="Ethernet0" static 8.8.8.8
netsh interface ipv4 add dns name="Ethernet0" 8.8.4.4 index=2
With these few commands, we've carried out all the IP configuration using Netsh.
You can switch back to DHCP configuration at any time with these two commands:
netsh interface ipv4 set address name="Ethernet0" dhcp
netsh interface ipv4 set dns name="Ethernet0" dhcp
D. Display TCP/IP configuration
Following TCP/IP configuration on the network card Ethernet0 using the previous commands, you can display the configuration with the following command :
netsh interface ip show configIt's the equivalent of ordering ipconfig but with a twist netsh.
E. Enable or disable a network interface
To activate or deactivate a network interface, use the following commands:
netsh interface set interface "Ethernet0" admin=enable
netsh interface set interface "Ethernet0" admin=disable
These commands are useful for quickly managing the status of network interfaces from the command line. The first command activates the interface, while the second deactivates it.
III. Netsh - Firewall management
This second part of the article is dedicated to firewall configuration with Netsh. This tool contains many options that meet this need, and it goes a long way. It is fully capable of adding a new Windows firewall rule. All Netsh commands for firewall management start with netsh advfirewall.
A. Display firewall rules
To begin with, we'll take a look at the firewall rules currently configured on the local machine. Run the following command:
netsh advfirewall firewall show rule name=allThis command lists all firewall rules. Its output is not very usable, as there are a large number of rules, so it is very verbose.
B. Add a new firewall rule
To add a new rule allowing incoming traffic on a specific port, we need to target the add rule option.
In this example, we authorize incoming traffic on port 23389 (RDP) with a rule named Autoriser le Bureau à distance. This may be useful if you wish to authorize Remote Desktop access on a special port (other than the default / 3389).
netsh advfirewall firewall add rule name="Autoriser RDP (In-23389)" protocol=TCP dir=in localport=23389 action=allowYou can then use the Windows graphical user interface to check the presence of the new rule created with Netsh.

If your aim is to enable pinging, this is also possible with a few adaptations.
netsh advfirewall firewall add rule name="Autoriser Ping (In-ICMP)" protocol=icmpv4 dir=in action=allowC. Disable firewall
If you need to temporarily disable the firewall, for example to diagnose an access problem, use the following command:
netsh advfirewall set allprofiles state offDon't forget to reactivate the firewall afterwards. Simply replace off by on in the command :
netsh advfirewall set allprofiles state onThese commands, like many others executed via Netsh, simply return a Ok.
D. Blocking an IP address
To block all incoming traffic from a specific (and suspicious) IP address, you can add a deny firewall rule. The example below creates a rule to block the IP address 192.168.14.200 :
netsh advfirewall firewall add rule name="Bloquer adresse IP suspecte" protocol=any dir=in interface=any action=block remoteip=192.168.14.200This rule will also be visible in the Windows GUI.
IV. Netsh - Wi-Fi configuration
Netsh is very useful for manipulating Wi-Fi networks on a Windows machine, in particular for displaying the current configuration, but not only that... Wi-Fi profiles can be exported in XML format, which also offers the opportunity to perform the opposite operation: import.
To learn more about this topic, read this article:
A. Display available Wi-Fi networks
To list available wireless networks, use the following command:
netsh wlan show networksThis command displays a list of Wi-Fi networks in range, with details such as SSID and security type.
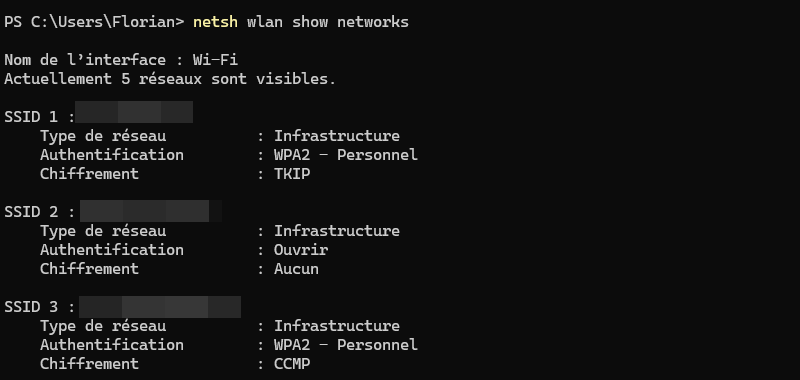
Note : if you run this command on Windows 11, you must enable location services (Settings > Privacy and security > Location), otherwise this command will not work properly.
B. Display known Wi-Fi networks
You can also list the Wi-Fi networks known to your machine, i.e. those to which you have already established a connection, or those pushed by the administrator (via a GPO or another system).
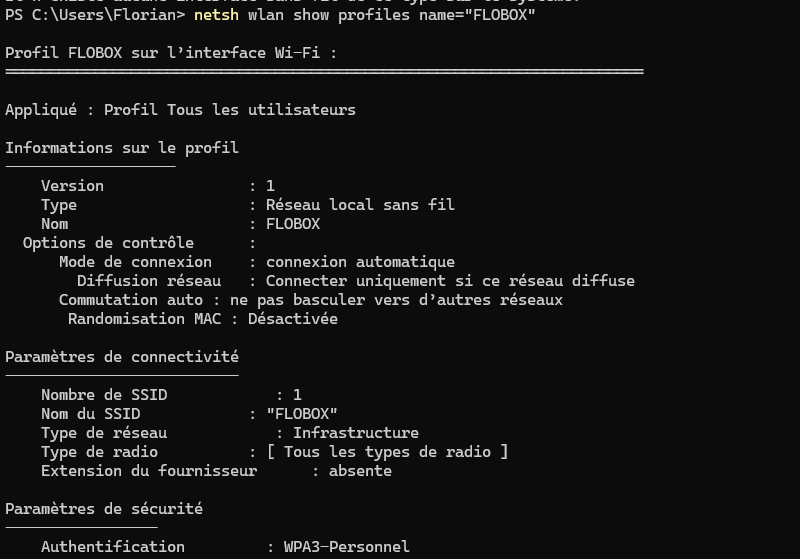
netsh wlan show profilesYou can even obtain precise information on a specific profile. Here, we target the profile named FLOBOX.
netsh wlan show profiles name="FLOBOX"Here is an extract of the result:
By adding an additional parameter, you can even display the security key in clear text. For example:
netsh wlan show profile name="FLOBOX" key=clearYou can also view the configuration of your wireless network card:
netsh wlan show driversC. Connect to a Wi-Fi network
To connect to a wireless network, use the following command:
netsh wlan connect name="MonWiFi"Replace MonWiFi the SSID of the network you wish to connect to. Your machine must already know this SSID, i.e. it must be in the list of saved profiles.
If this is not the case, you must first export a configuration file from a machine that knows the network. The following example exports network connection information FLOBOX. The output XML file will be stored in C:ExportWiFi and it will contain the security key in plain text.
netsh wlan export profile name="FLOBOX" folder="C:ExportWiFi" key=clearThen import this file on the machine that is to connect to it:
netsh wlan add profile filename="C:ImportWiFiWi-Fi-FLOBOX.xml"Next, it will be possible to establish a connection to the Wi-Fi network.
V. Netsh - Network troubleshooting
On Windows, Netsh is an essential tool for network troubleshooting. It provides access to a number of very useful commands for working on the Windows network stack. These include commands for resetting network components.
A. Reset TCP/IP stack
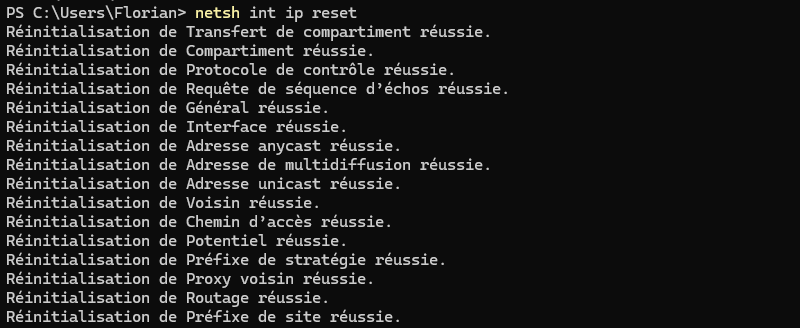
If you're experiencing network problems, resetting the TCP/IP stack can solve some of them. Especially when you're starting to go round in circles, because all your other repair attempts are coming to nothing... In this case, you can try using the following command:
netsh int ip resetAfter running this command, restart your PC to apply the changes. It may just solve your problem! Please also note that IP and DNS configuration will be reset to default settings. So if you had a static IP address configured, it will be deleted! The network card will be configured for DHCP (automatic assignment).
In addition to this command, if you have connectivity problems, you should try this one:
netsh winsock resetThis command, which requires a restart, returns the following result:
Le catalogue Winsock a été réinitialisé correctement.
Vous devez redémarrer l’ordinateur afin de finaliser la réinitialisation.
How to order netsh winsock reset resets the Winsock catalog, which manages network connections under Windows. It corrects Internet connection problems caused by socket corruption. This can occur, for example, after uninstalling software linked to the computer's network.
B. Reset firewall settings
In the same spirit as the previous command, you can do the same thing with the Windows Defender firewall. To reset the firewall configuration to default values, use the following command:
netsh advfirewall resetThis will remove all custom rules, restoring the firewall to its original state. Once again, this can be useful in certain contexts (configuration reset, for example).
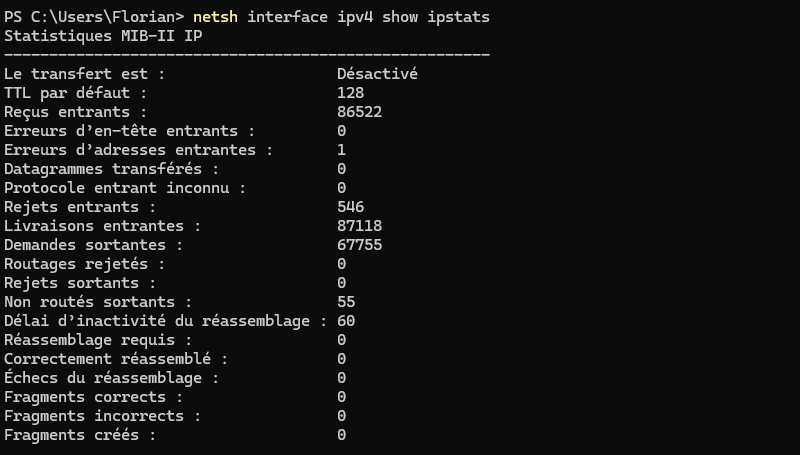
C. Display network statistics
When you're diagnosing a network problem and there's packet loss, you can use Netsh to get more precise information. Thanks to the ipstatsYou can obtain detailed statistics on network usage. This includes information on rejected packets, incorrect fragments, etc... As well as overall flows.
netsh interface ipv4 show ipstatsHere's an example:
D. Network troubleshooting with Netsh trace
netsh trace represents a mode of Netsh use that enables network packets to be captured according to various predefined scenarios. Unlike tools such as Wireshark, Netsh is natively integrated into Windows. The good news is that the output file generated by Netsh will be readable by Wireshark (and other software).
You can list all available scenarios with the following command:
netsh trace show scenariosThere are 18, which you can see in the image below.
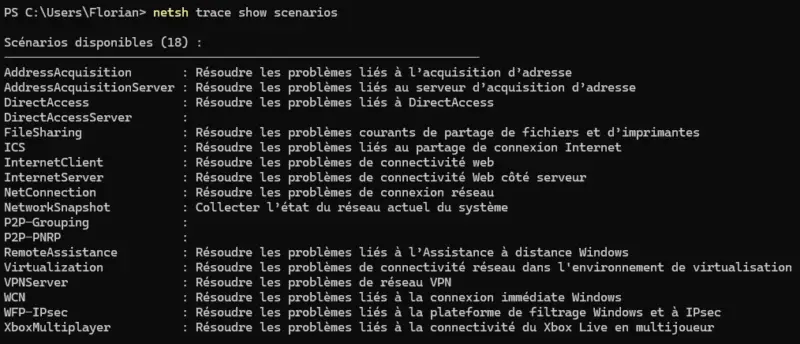
If you have a network connection problem, which is the context of this part of the article, the first thing to look at is the scenario NetConnection. The script InternetClient is also relevant, as it captures events related to Internet access, including DNS, TCP and HTTP.
You can start an analysis this way:
netsh trace start scenario=NetConnection capture=yes tracefile=C:TEMPNetshNetConnection.etlHere, the trace will be saved in the C:TEMPNetshNetConnection.etl on the local computer. It will run in the background, and it's up to you to stop it. So you need to reproduce your network problem, then stop the capture this way:
netsh trace stop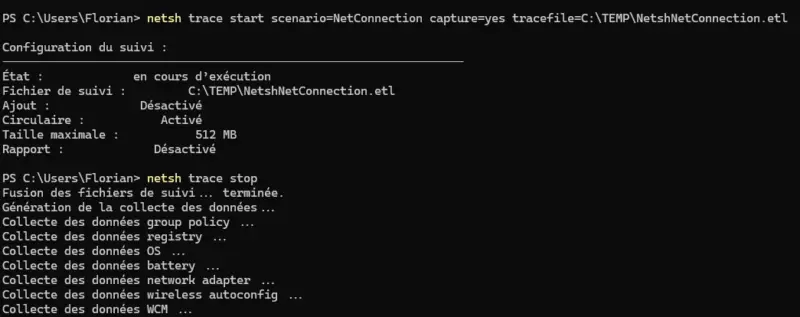
Once Netsh has collected all the information, you can access the ETL file. However, it cannot be read natively by Wireshark. You need to convert it to PCAP format. The etl2pcapng tool available on GitHub can help you with this conversion:
.etl2pcapng.exe NetshNetConnection.etl NetshNetConnection.pcapngThe file NetshNetConnection.pcapng can be read using Wireshark! This will enable you to perform the analysis from another machine.
E. Diagnosing Wi-Fi problems with Netsh
Finally, let's take another look at the options available in the netsh wlan and more specifically, the tool's built-in reporting functionality! The command you'll discover here generates a detailed report on the state of Wi-Fi over the last 24 hours. This duration can be customized to suit your needs.
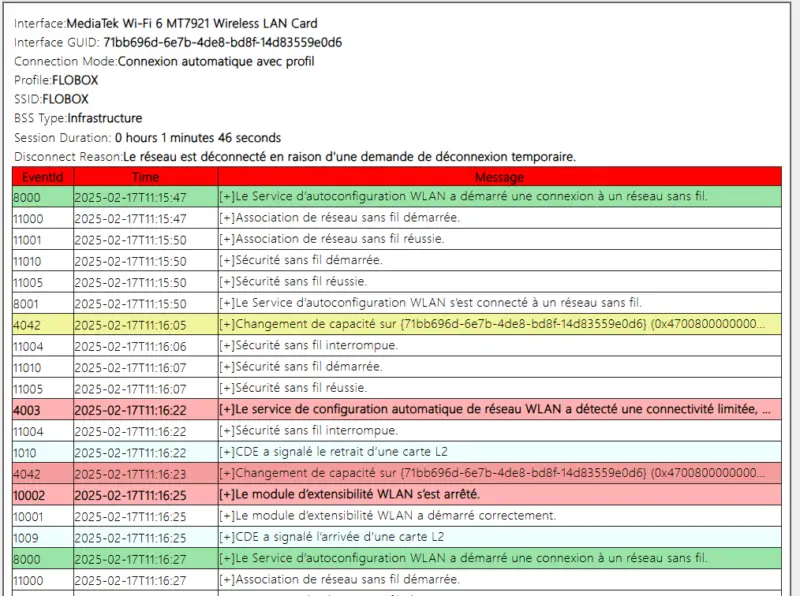
This HTML report includes information on Wi-Fi connections and disconnections, network errors, Wi-Fi-related system events and overall performance. In other words, you'll see the machine's Wi-Fi history over the last X days. The output file will be generated in the directory C:ProgramDataMicrosoftWindowsWlanReport.
netsh wlan show wlanreport duration=1Once the data collection is complete, you can open the resulting report : C:ProgramDataMicrosoftWindowsWlanReportwlan-report-latest.html.
The report header shows a graph with Wi-Fi sessions and main events.
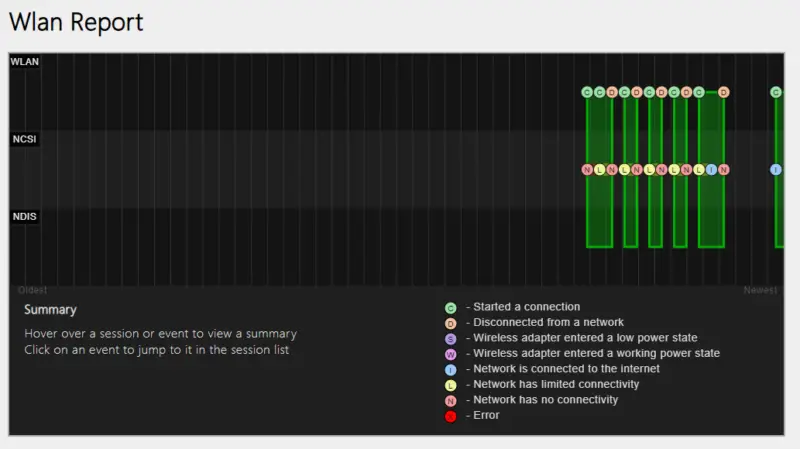
If you scroll down, you get detailed information, including a report for each Wi-Fi session. You get the name of the network, the duration of the session, and all related events. Errors and anomalies are also highlighted. Here's an example:
This is one of the best features of the Netsh tool! And yet, it's relatively unknown.
VI. Conclusion
This guide to getting started with Netsh comes to an end. The various commands and their contexts of use discussed in this article illustrate the full potential of this tool, which has the major advantage of being directly integrated into Windows.
What do you think? Do you know of any other Netsh use cases? Please feel free to comment on this article.