Linux : how to mount an SMB share (Windows)?
Table of Contents
I. Introduction
How do you mount a Windows file share on Linux? Or, to put it another way, how do you access a network share via the SMB (CIFS) protocol from Linux? This article will answer both questions!
Under Windows, the SMB protocol is supported by default. It is therefore natural to connect to a remote network share using this protocol. Under Linux, accessing an SMB share involves installing a specific package, then using several commands to "mount" the share and gain local access (like a network drive).
For my part, I'm going to use a machine running Ubuntu, but you can also use a Debian, AlmaLinux or Fedora machine. The goal will be to access the following network share: \\srv-adds-01.it-connect.local\Partage. This share is hosted on a Windows Server machine, but it could be another Linux machine or a NAS.
This article does not cover how the SMB protocol works, nor how to create an SMB file share on Windows or Linux.
II. Installing prerequisites
We'll start by installing the "cifs-utils" package, as it is required to mount an SMB share (CIFS) on a Linux machine. Open a terminal and run the following commands:
sudo apt-get update
sudo apt-get install cifs-utils -y
The first stage has been completed!
A. Create a mounting point
Linux must be able to associate the remote share with a local path, known as a mount point. We therefore need to create a directory that will be used to map the remote share. Here, we create the directory "/mnt/share". This will be our local path to access the share's contents.
sudo mkdir /mnt/partageTo mount the share, we'll use the mount command. Under Linux, this command is used to make a network share or storage device accessible in the local file system. Here's the command we need to execute to meet our requirements:
sudo mount -t cifs //srv-adds-01.it-connect.local/Partage /mnt/partage -o username=florian.burnel@it-connect.localHere are some explanations of the syntax used:
- -t cifs: specifies the type of file system to be used, in this case CIFS, i.e. SMB
- //srv-adds-01.it-connect.local/Share: indicates the full address of the network share
- /mnt/share: indicates the local mount point where the contents of the network share will be accessible once mounted. Here, files in the shared folder will be visible in /mnt/share.
- -o: declare assembly options
- username=florian.burnel@it-connect.local: provides the user name for authentication on the network share. Here, the user is "florian.burnel" in the "it-connect.local" domain (Active Directory account).
To specify the password directly (in clear text), use this syntax:
sudo mount -t cifs //srv-adds-01.it-connect.local/Partage /mnt/partage -o username=florian.burnel@it-connect.local,password=P@ssword!Note : instead of the server's DNS name, you can specify an IP address. However, it is preferable to work with full names (FQDN).
We then enter the account password interactively. If there's no return in the console, the operation has been successful. To confirm this, simply list the contents of the "/mnt/share" directory: it should display the contents of the share, visible on the file server.
ls -l /mnt/partage
We can access this directory directly via the cd command, but also display information about the share via the df command.
df -h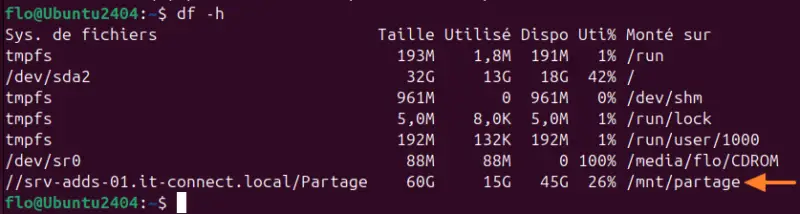
The disadvantage of this method (which can be an advantage, depending on our needs) is that it mounts the file share temporarily. If you reboot your Linux machine, the file share will no longer be accessible! The "/mnt/share" directory will still be present, but the remote share will no longer be mounted!
Now we're going to change our configuration so that the Windows file share is automatically mounted when our Linux machine starts up. This will save us having to issue the mount command again and again.... In addition to automatically mounting the share, we also need to manage the user credentials so that we don't have to enter the user's password every time.
We'll start by modifying the"/etc/fstab" file to add an automatic mount point.
sudo nano /etc/fstabThen, in this file, we will add this line :
//srv-adds-01.it-connect.local/Partage /mnt/partage cifs credentials=/etc/smb-partage-creds 0 0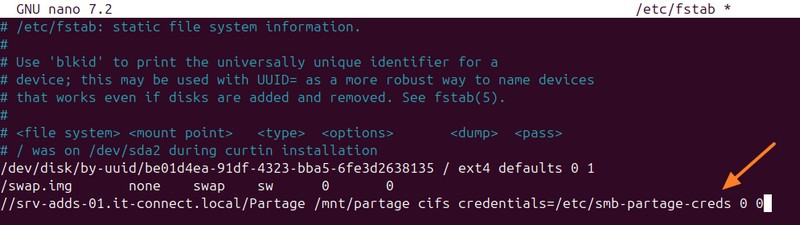
Here are some explanations:
- //srv-adds-01.it-connect.local/Share: remote share to be mounted
- /mnt/sharing: local editing point
- cifs: file protocol to be used (SMB)
- credentials=/etc/smb-partage-creds: file with credentials
- 0 0: file system dump and check options (0 or 1)
We could also specify the identifiers directly in the fstab file, but it's better to use the method described above.
Save and close this file.
We're now going to create the "/etc/smb-partage-creds" file, which we'll use to store the identifiers.
sudo nano /etc/smb-partage-credsEnter your username and password as follows:
username=florian.burnel@it-connect.local
password=P@ssword!
Save and close the file. To prevent unauthorized access, we'll change the permissions on this file with the chmod command:
sudo chmod 600 /etc/smb-partage-credsAll you have to do now is restart your Linux machine to test the configuration (or reload fstab)! If it's correct, you should have access to the SMB share and its data!
Finally, let's take a look at how to unmount a CIFS share on Linux. In other words, if the share is mounted and you wish to disconnect it. Simply use the umount command and specify the local mount point.
In our case, this is the command to execute:
sudo umount /mnt/partageV. Conclusion
After reading this tutorial, you now have all the basics you need to set up a CIFS (SMB) share on your Linux system.
By following these steps, you should be able to mount a file share temporarily or permanently, and even disconnect it from the system. If you encounter any difficulties, check the syntax of your commands, as well as the user permissions on the remote share.