How do I use sudo on Linux? Our complete guide with examples
Table of Contents
I. Introduction
To administer a Linux machine, you need to use the root account, which refers to the superuser, or the sudo command. What is the role of this command on Linux? What are its advantages, particularly in terms of security? How do I configure the /etc/sudoers file?
The aim of this article is to answer a series of questions that may arise from the moment you become interested in the sudo command. To make this documentation as complete as possible, I've included a set of examples that you can apply to your own context and needs.
II. What is the sudo command?
On Linux, certain configuration, administration and security actions rely on the use of the rootto benefit from a sufficient level of privileges. In fact, these potentially sensitive actions are not accessible to all users, which is good news.
However, it is not recommended to connect to a machine as root when administering it. So how do you go about it? This is where the sudo ! It allows you to execute commands with elevated privileges from a standard user account, and therefore without directly using the root.
The sudo program, which stands for "SubstituteUser DO", allows a user to execute a command with the privileges of another user, usually . root.
When a user executes a command with sudo, they must enter their own password. In addition, all actions performed via sudo are logged, enabling monitoring and improving security. As we'll see later, a user must be authorized to use the sudo command and perform this temporary change of privileges.
Note : on Linux, you can't create multiple root accounts, whereas on Windows, you can create multiple administrator accounts. Sudo meets this need for secure administration of a Linux machine by several people.
III. What are the advantages of sudo?
There are several advantages to using sudo, mainly in terms of security and rights management. Rather than sharing the root password between several users, each user has his or her own password and can be authorized to execute specific commands. In other words, this will prevent misuse of the root account, while keeping track of who has done what.
In addition, sudo allows you to restrict access to certain commands, and disables prolonged use of elevated privileges by setting an expiry time (the user will have to re-enter his password).
In short, sudo plays a key role in Linux machine security. It is essential to use it to delegate permissions. In comparison with Windows, this is equivalent to elevating privileges via UAC, when an action requiring administrator rights needs to be performed.
IV. How to install sudo on Linux
The sudo program may or may not already be installed on the Linux machine. This depends not only on the distribution you're using, but also on the installation mode. Here are a few examples:
- If you install Ubuntu with a desktop environment, the user created during installation will be authorized to use sudo, and sudo will be installed.
- If you install Debian without a GUI, there will be a standard user account and sudo will not be installed.
- If you install Debian without assigning a password to the root account, then the first user will be authorized to use sudo, and sudo will be installed.
This shows that it is quite possible to find a machine where sudo is not installed... As a result, you may need to install it. Here's how to install sudo on Linux:
# Debian / Ubuntu
apt-get install sudo

# Fedora
dnf install sudo
Now let's take a look at some examples of howsudo is used.
V. How do I use sudo?
Once sudo has been installed on your machine, you're ready to use it. Although you will need to grant permission to the user you wish to administer your machine.
A. Executing a command with sudo
Let's start with a very simple example. If the user flo wishes to update the packages on his system, he can use the following command:
apt update && apt upgrade -yThe problem is that it will not have the necessary privileges to perform these actions... This is where the sudo command comes in. Which gives:
sudo apt update && sudo apt upgrade -yYou will be asked to enter your password before the command is executed. The requested actions will be carried out without directly using the root account.
B. Executing a command as another user
By default, sudo executes commands as root. However, you can use the -u option to run a command as another user. If you didn't know, you do now: sudo is not limited to executing commands as root.
For example, to run a command as the user it-connect :
sudo -u it-connect whoamiHow to order whoami is used to see which user is currently in use in the Terminal. Below, we can see the difference between executing the command alone or as another user.

C. Launch a temporary root shell
If flo wishes to temporarily switch to root mode within a Terminal, it can execute this command with the option -i :
sudo -iThis will open a root shell for him until he exits with exit. He will then switch to a shell whose prompt will be root@NomMachine:~#. This is a less frequent use, but one to be aware of.
VI. Configuring the /etc/sudoers file
According to the previous examples, the user flo has the necessary permissions to use sudo. How is this authorization defined? How can I authorize another user to use the sudo command? Is it possible to limit the commands authorized? That's what we'll be looking at in this part of the article.
The configuration of sudo is based on the /etc/sudoers file, which defines user rights. It must be modified with the command visudo to avoid syntax errors.
A. Add a user to the sudo group
As we saw in another article on adding a sudo user on Linux, users belonging to the group sudo can execute commands with sudo. To add the user adm_flo to this group:
usermod -aG sudo adm_floYou can then list your current permissions:
sudo -lHere's the result we get in the user's context flo :
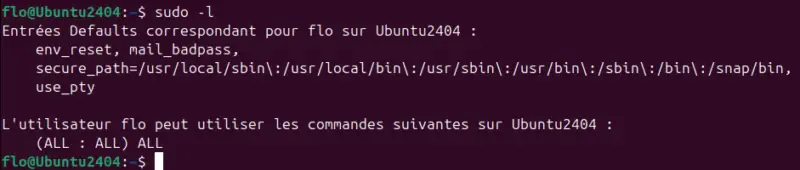
This returns the account permissions after analyzing the directives defined in the /etc/sudoers. Here we can see that the user flo can execute any command on the Linux machine (as root).
You can also check that the user belongs to the sudo group with this command:
id floIn the returned list, there's a reference to verify this. This would also work with the groups.
uid=1000(flo) gid=1000(flo) groupes=1000(flo),4(adm),24(cdrom),27(sudo),30(dip),46(plugdev),100(users),114(lpadmin),2000(administrateurs)B. Editing sudoers configuration with visudo
To modify the configuration file sudoers, there is a specific tool: visudo. We could use nano or another text editor, but the best practice is to use visudo.
The advantage of using visudois that the tool will lock the configuration file /etc/sudoers to avoid having several people working on it, but also - and this is important - it will check the syntax of any rules added or modified!
To modify the /etc/sudoers file, we will use this command:
sudo visudo
or, if you are logged in as root :
visudo
The contents of the sudoers is displayed on the screen.

In this file, if you scroll down to the end, you'll notice several interesting lines. Here, on an Ubuntu machine.
# User privilege specification
root    ALL=(ALL:ALL) ALL

# Members of the admin group may gain root privileges
%admin ALL=(ALL) ALL

# Allow members of group sudo to execute any command
%sudo   ALL=(ALL:ALL) ALL
These three guidelines mean the following:
- The first line allows the user
rootto execute all commands with full privileges. - The second line allows all members of the
admingroup to execute all commands usingsudo - The third line is identical to the rule for the
admingroup, but this time for users belonging to thesudogroup.
Note that the line corresponding to the admin is not present on all Linux systems. It is very common to have only the sudo.
C. Syntax of a sudo rule
To create rules, a precise syntax must be respected. Let's take the example of the sudo :
%sudo ALL=(ALL:ALL) ALL
Here's how to interpret it:

This also makes it easier to understand the comment associated with this command in the sudoers. Each of these values can be modified to refine the rule.
Here are a few more details about syntax:
- User / group: to specify a user, simply indicate its identifier, while for a group, add the prefix
%. Only one user or group is specified per line! - Host: specifying
ALLmeans that this rule applies to all machines - All users: allows you to specify the user whose rights you want to take over.
ALLwe take into account all users, including userroot(what we're interested in) - All groups: same as for users
- All commands: used to specify the command(s) that the user (or group) specified at the beginning of the line can execute on the machine. If there are several commands, use a comma as a separator.
Note: in terms of administration, you can give rights directly to groups and then add the user(s) to that group.
D. Create a new rule in sudoers
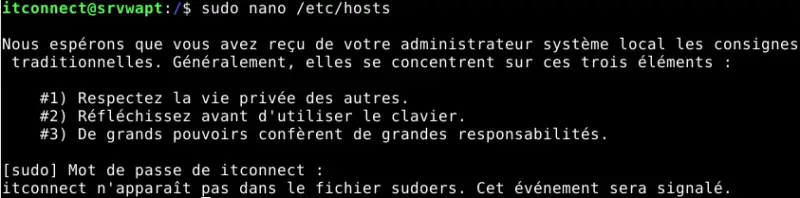
Now let's take the example of a standard user, not a member of the group sudo and named itconnect. We are going to give him the rights to edit the file /etc/hosts via nano. This system file is write-protected and cannot be modified by any user.
Currently, the sudo command doesn't allow me to open this file for writing, as the directive is missing from the file sudoers. This results in the following error: " itconnect does not appear in the sudoers file. This event will be reported ".
With the help of the user root user (or flo), we're going to modify the sudoers file with visudo and add the following line:
itconnect ALL=(ALL) /usr/bin/nano /etc/hosts
It is important to specify that the full path to the binary must be given, in this case nano. To easily find the path to the binary, use the command which for example:
which nano
With this directive, the user itconnect is able to modify the /etc/hosts ! You'll need to run :
sudo nano /etc/hosts
The user must then enter his or her password. Note that sudoers supports the NOPASSWD option: this indicates that the user can execute this command without having to enter his password. This is not recommended, but it is a possibility.
If we return to the previous example, the result is this modification:
itconnect ALL=(ALL) NOPASSWD:/usr/bin/nano /etc/hostsNow, to go a step further, let's see how to use the notion of alias with sudoers.
Note : the order of the rules is important and should not be overlooked. If several rules apply to the same case, the last one to apply will be taken into account. In other words, all rules are evaluated.
E. Sudoers and aliases
At the very beginning of the sudoerswe can see several sections declared in the first part :
# Host alias specification
# User alias specification
# Cmnd_alias specification
These three sections allow you to declare aliases for hosts, users and commands. For example, we can create a user alias ADMINS and associate several users with it. Then, in rules, we can use this alias rather than calling users one by one or creating a specific group if we want to create a rule common to several users.
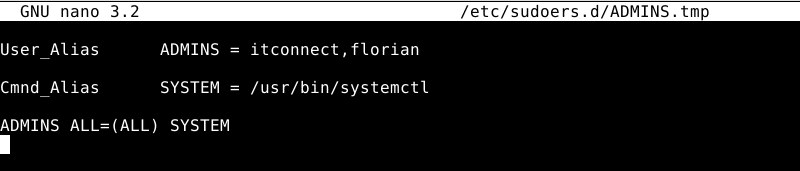
Let's take an example... We're going to create a user alias named ADMINS and will refer to two accounts: itconnect and flo. Separate each name with a comma. Which gives:
User_Alias ADMINS = itconnect, flo
Next, we'll declare a command alias named SYSTEM. It will refer to the systemctlbut it could contain several commands. Which gives:
Cmnd_Alias SYSTEM = /usr/bin/systemctl
Finally, to create a rule that allows ADMINS to use SYSTEM commands, this will give the following rule:
ADMINS ALL=(ALL) SYSTEM
Users and itconnect and flo users can now execute all commands associated with the alias SYSTEM.
F. Sudoers and the "!" exclusion character.
Within a rule, specifying the ! character in front of the command will allow it to be forbidden. For example, we can authorize the user itconnect change user passwords, except for user root. We must therefore add the following rule :
itconnect ALL=(ALL) /usr/bin/passwd, !/usr/bin/passwd rootFollowing the application of this directive, here's the result:

G. Modify sudo command expiry time
When the sudo is used, we must enter the password of the user account that initiated the action to validate the operation. Then, if we execute a new command sudo, the password is not required, as access remains unlocked for X minutes. By default, this value seems to vary according to the distribution used, sometimes 5 minutes, sometimes 15 minutes.
This security measure is important, but it can be adjusted. In fact, it is possible to modify this value to indicate the expiry time (timeout) you want for sudoers.
Within the sudoers file, following the other lines Defaults declare the following line:
Defaults timestamp_timeout=5
The lines Defaults lines are used to set sudo's default and global parameters.
Here are a few more examples:
# Apply a Defaults rule to a specific user
Defaults:flo    timestamp_timeout=10

# Ask for the password for every command
Defaults        timestamp_timeout=0

# Always display the sudo warning on every use
Defaults        lecture=always

# Show asterisks * when entering the password (hidden by default)
Defaults        pwfeedback
VII. The /etc/sudoers.d file
From now on, we'll leave the sudoers to talk about /etc/sudoers.d. This folder is used to store declarative files for sudoers which will be read in addition to the sudoers in itself. Please note that all files containing "~" or "." in the name will not be read! This is particularly useful for organizing rules by file, rather than centralizing everything in the same file: the sudoers will always be read, no matter what.
To create a new file named ADMINSwe'll always use the command visudoin this way:
visudo /etc/sudoers.d/ADMINS
We could then include our previously created aliases and rule within this file.
VIII. Traceability of sudo actions
One of the advantages of sudo is the ability to trace all actions performed by users. Commands executed via sudo are saved in the log file /var/log/auth.log (on Debian/Ubuntu) or /var/log/secure (on Red Hat/Fedora).
Let's imagine that, on a Linux machine, a user tries to use the sudo command when he or she is not authorized to do so. This will immediately generate a new log line.
Here's an example:
sudo: itconnect : user NOT in sudoers ; TTY=pts/0 ; PWD=/home/flo ; USER=root ; COMMAND=/usr/bin/apt-get updateWe understand that the user itconnect tried to execute the command apt-get update. The attempt was refused.
If the action is authorized, it is also added to the log file. Below, we can see that the user flo used the sudo to run the passwd it-connect.
sudo: flo : TTY=pts/0 ; PWD=/home/flo ; USER=root ; COMMAND=/usr/bin/passwd it-connectIX. Conclusion
This tutorial on using the sudo command and configuring sudoers under Linux is coming to an end. Thanks to this guide to sudo use and configuration, you'll have all the information you need to get to grips with it and make good use of it.
By understanding how to use it and how to configure /etc/sudoers, with tailor-made rules, it is possible to limit the risks of compromising a Linux machine. And all the while allowing users to perform the tasks they need to.
Finally, if you're still not convinced of the value of sudo - which would surprise me, anyway - you should know that ANSSI recommends its use. This recommendation is considered a best practice and is described in the guide"Recommandations de sécurité relatives à un système GNU/Linux" (Security recommendations for a GNU/Linux system).