Signing a PowerShell script with a self-signed certificate
Table of Contents
I. Introduction
In this chapter, we'll learn how to sign a PowerShell script using a self-signed certificate: an easy-to-implement method that ensures no one has made any changes to your script. If the script is modified, it will refuse to run, as the signature will no longer be valid.
This method is an alternative to the one based on using a Certification Authority (CA) to obtain a certificate to sign the code. This scenario was discussed in a tutorial on IT-Connect: signing a PowerShell script using a certificate obtained from a certification authority (ADCS). I recommend the CA-based method for production use, as the certificate used will be automatically recognized by the servers and workstations on your information system. Conversely, the self-signed script must be deployed manually on the machines, and although it can work in production and provides a minimum of security, it is recommended for test environments.
To sign a PowerShell script, there are three ways of obtaining a certificate:
- A certificate purchased from a recognized certification authority such as DigiCert or GeoTrust, but this involves financial costs of several hundred euros. If your aim is to sign your PowerShell scripts for use in your company, this is probably not the right solution. For wider distribution, however, why not?
- A certificate generated by an enterprise certification authority, such as the ADCS linked to Active Directory
- A self-signed certificate
This digital signature will sign the code and ensure its integrity: if it is modified, it will have to be signed again, otherwise it won't be able to run.
II. New-SelfSignedCertificate: generating a self-signed certificate
To generate a self-signed certificate under Windows, we can use the "New-SelfSignedCertificate". This certificate can be stored in the user's personal store or in the computer's store (global availability on the machine). We're going to store it in the computer's store, which corresponds to the following path:"Cert:LocalMachineMy".
Here is the command to use to generate a self-signed certificate:
# Create a self-signed certificate
$SelfSignedCert = New-SelfSignedCertificate -Subject ScriptPowerShell -Type CodeSigningCert -CertStoreLocation Cert:LocalMachineMy -FriendlyName"Signer scripts PowerShell" -NotAfter (Get-Date).AddYears(5)
The certificate information is stored in the "$SelfSignedCert" variable, as we'll be importing this certificate into other stores on our machine. Otherwise, here's some additional information on the parameters used:
- -Subject: certificate name as it will appear in the certificate management console
- -Type CodeSigningCert: the type of certificate, in this case a certificate for signing code.
- -CertStoreLocation: the store in which to store the certificate, in this case the computer's personal store.
- -FriendlyName: the certificate's family name
- NotAfter (Get-Date).AddYears(5): 5-year validity for the certificate, otherwise it defaults to 1 year
You can list the"CodeSigningCert" certificates in your computer's personal store with this command:
Get-ChildItem -Path Cert:LocalMachineMy -CodeSigningCert

Logically, the newly created certificate should appear in the list of results.
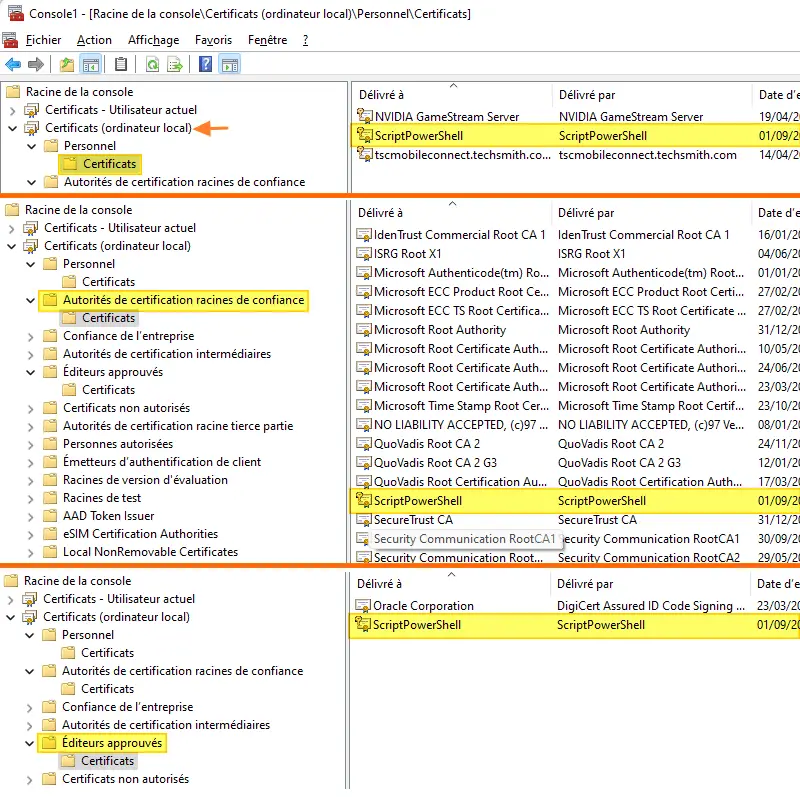
For the digital signature to be recognized, or rather for the whole chain to be recognized, we need to add this certificate to two other stores:"Trusted Root Certification Authorities" and"Approved Publishers". Otherwise, the script won't be able to run with the "AllSigned" execution policy.
Again in PowerShell, this operation is performed with the following lines:
# Add the certificate to "Trusted Root Certification Authorities".
# Create an object to represent the LocalMachineRoot certificate store
$rootStore = [System .Security.Cryptography.X509Certificates.X509Store]::new("Root", "LocalMachine")
# Open the store for reading and writing
$rootStore.Open("ReadWrite")
# Add the certificate to the store, using the contents of the variable $SelfSignedCert
$rootStore.Add($SelfSignedCert)
# Close the certificate store
$rootStore.Close()

# Add the certificate to "TrustedPublishers".
# Create an object to represent the LocalMachineTrustedPublisher certificate store
$publisherStore = [System .Security.Cryptography.X509Certificates.X509Store]::new("TrustedPublisher", "LocalMachine")
# Open the store for reading and writing
$publisherStore.Open("ReadWrite")
# Add the certificate to the store, using the contents of the variable $SelfSignedCert
$publisherStore.Add($SelfSignedCert)
# Close the certificate store
$publisherStore.Close()
We could have used the"Import-Certificate" cmdlet, but that would have meant exporting it in CER format beforehand. If you open an MMC console, add the"Certificates" component for the local computer, you'll see the certificate in three locations, as in the example below.
III. Set-AuthenticodeSignature: sign the PowerShell script
The"Set-AuthenticodeSignature" cmdlet can be used to sign PowerShell scripts, regardless of the nature of the certificate. Let's start by storing the path of the script to be signed in a :
$PathScriptToSign = "C:TEMPScript.ps1"
For your information, this script contains a single line that writes a sentence to the console:
Write-Host "This script is executed on machine $($env:COMPUTERNAME)"
Next, the "$PathCertToUse" variable will contain the path to the certificate, within the computer's personal store. In this command, you'll need to adapt the certificate name unless you're using the same one as me ("ScriptPowerShell").
$PathCertToUse = "Cert:LocalMachineMy" + (Get-ChildItem -Path Cert:LocalMachineMy -CodeSigningCert | Where{ $_.Subject -eq "CN=ScriptPowerShell" }).ThumbprintThis variable will contain the following value (except that your footprint will be different):
Cert:LocalMachineMyCF5F933794EE29B1E4B9FDE63D30E8131915571D
Now all that remains is to sign the script, provided that the path to the script is valid, as is the path to the certificate, hence the "if" condition in the code below. If both paths are valid, we sign the script using the certificate information stored in the "$DataCertToUse" variable.
if((Test-Path $PathScriptToSign) -and ($PathCertToUse -ne "Cert:CurrentUserMy"))
{
 Write-Output "The script $PathScriptToSign will be signed with the certificate ($PathCertToUse)"
 $DataCertToUse = Get-Item -Path $PathCertToUse
 Set-AuthenticodeSignature -FilePath $PathScriptToSign -Certificate $DataCertToUse -TimestampServer "http://timestamp.comodoca.com/authenticode"
}
The script is well signed, with the status"Valid" thanks to the fact that we imported the certificate into"Trusted root certification authorities" and"Approved publishers". Otherwise, we would have had the status"UnknownError" (which does not prevent the script from being signed).

Here is some additional information on the "Set-AuthenticodeSignature" command:
- Certificate: code-signing certificate information
- -FilePath: path to the PS1 file of our PowerShell script
- -TimestampServer: We use an external service to date our signature, so that when the certificate expires, the signature will still be valid, because it was created while the certificate was valid. Other possible value:"http://timestamp.digicert.com/"
If we look at the contents of the PowerShell script, we can see that there is a new block named "SIG" corresponding to the digital signature:

Note: if you remove the SIG block from your script, the signature is removed and the script becomes unsigned again.
In the file properties, the"Digital signatures" tab provides information about the signature:
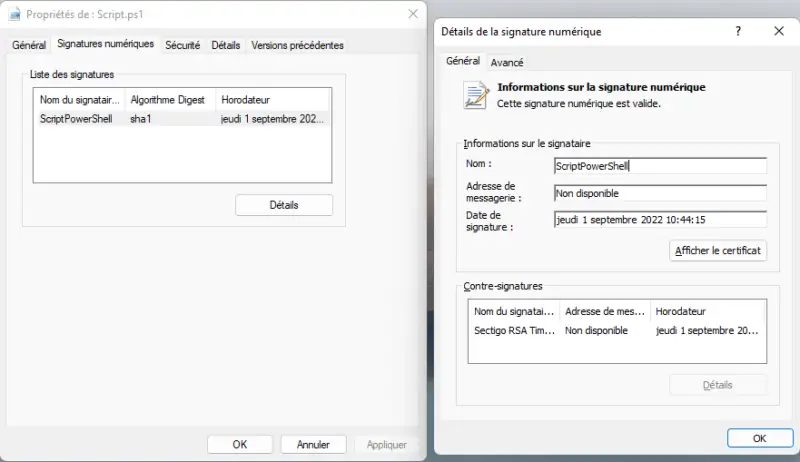
With PowerShell and the "Get-AuthenticodeSignature"we can also obtain information on the :
Get-AuthenticodeSignature -FilePath "C:TEMPScript.ps1" | fl
The script is signed, so we'll try to execute it.
IV. Executing a signed PowerShell script
To make sure that our machine only allows signed scripts to be executed, we can change the execution policy to"AllSigned", like this:
Set-ExecutionPolicy AllSigned
Following this modification, the local machine will only allow the execution of signed scripts. If I use this execution policy and execute "Script.ps1" before it is signed, we can see that execution is blocked:

However, after signing via our certificate, it works!

Warning: if you use this signed script on another machine, the digital signature will not be recognized if the certificate is not imported (which requires additional handling)! This is a constraint of using a self-signed certificate.
In practice, from the server containing the script, we can export the certificate (to generate the file "C:TEMPScriptPowerShell.cer"):
$PathCertToUse = "Cert:LocalMachineMy" + (Get-ChildItem -Path Cert:LocalMachineMy -CodeSigningCert | Where-Object{ $_.Subject -eq "CN=ScriptPowerShell" }).Thumbprint
Export-Certificate -Cert $PathCertToUse -Type CERT -FilePath C:TempScriptPowerShell.cer
Next, the"ScriptPowerShell.cer" file must be copied to the remote host. Once this has been done, in "C:TEMP", for example, it needs to be imported into the three locations:
# Import the certificate into the local computer's personal store
Set-Location Cert:LocalMachineMy
Import-Certificate -FilePath "C:tempScriptPowerShell.cer"

# Import certificate into "Trusted Root Certification Authorities".
Set-Location Cert:LocalMachineRoot
Import-Certificate -FilePath "C:tempScriptPowerShell.cer"

# Import certificate into "Trusted editors".
Set-Location Cert:LocalMachineTrustedPublisher
Import-Certificate -FilePath "C:tempScriptPowerShell.cer"
Once this has been done, it will be possible to run the signed script, as the signature can now be recognized by this machine. On the other hand, we need to bear in mind thateach time we modify the script, we'll have to sign it again using your self-signed certificate.
V. Conclusion
We've just seen how to sign and run a PowerShell script on a Windows machine using a self-signed certificate! Finally, when you download a PowerShell script from the Internet, remember to check its content, whether it's a signed script or not.