Error handling with Try-Catch-Finally
Table of Contents
I. Introduction
In this chapter, we'll learn how to use the Try, Catch and Finally statement blocks with PowerShell, as they will play a key role in error handling in a PowerShell script.
In fact, this instruction block is very practical, as it allows you to try and execute the code contained in the "Try" block, and if this code returns an error (and only in this case), you execute the code contained in the "Catch" block. This is possible because the "Catch" block will have managed to capture the error returned by the "Try" block. The " Finally" block is optional, as it is always executed. With a "Try-Catch" instruction block, you'll be able to handle errors cleanly in your PowerShell scripts.
II. PowerShell and Try, Catch and Finally syntax
As we'll see in a few examples, the"Try-Catch " instruction pair is very practical and I personally use it a lot in my scripts. On the other hand, the last"Finally" block isn't used very often because of the way it works: it's always executed, whether there's an error or not.
Here's the syntax of a Try-Catch-Finally block:
try
{
   <code to be executed, which could potentially generate an error>
}
catch
{
   <code to execute when an error occurs in Try>
}
finally
{
  # Optional
   <code to be executed in all cases, regardless of the result of Try>
}
The "Finally" block is optional and the code contained in this block will always be executed, regardless of the result of the "Try" block. In other words, it makes no difference whether the code is in the Finally instruction or at the end of the script after the "Catch", since it will be executed in both cases. I'd like to say that it's there above all to produce clean code and to maintain a certain logic with regard to the instruction in the "Try-Catch".
Without the "Finally" instruction, the syntax is as follows:
try
{
   <code à exécuter, et qui potentiellement, peut générer une erreur>
}
catch
{
   <code à exécuter lorsqu'une erreur se produit dans le Try>
}
To sum up, here is the general operating logic:
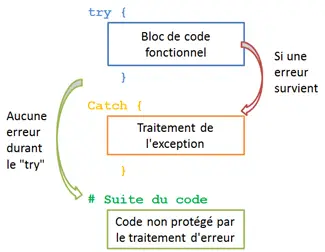
Before moving on to the examples, please note that it is possible tointegrate several Catch instructions to handle errors on a case-by-case basis, as we'll see in the next part of this article. On the other hand, the "Try" and "Finally" blocks are necessarily unique.
III. Try, Catch and Finally examples with PowerShell
In the examples below, you'll learn how to manipulate "Try-Catch-Finally" instruction blocks in PowerShell. These examples will help you understand how "Try-Catch" works.
A. Try-Catch: a basic example
We're going to retrieve the contents of our Windows machine's "hosts" file and store them in a variable. As a reminder, here's the full path to this file: "C:WindowsSystem32driversetchosts". In the event of an error, we'll simply display a message saying that the file cannot be found.
- TryCatch1.ps1" script:
$File = "C:WindowsSystem32driversetchosts"
try
{
 $FileContent = Get-Content $File
 Write-Host -ForegroundColor Green "Recovered file content ($File)"
}
catch
{
 Write-Host "Warning, the file $File cannot be found!" -ForegroundColor Red
}
If you run this script, you will get the following result:

This is normal since the file exists, so the "Get-Content" cmdlet returns no error. This means that the code present in the "Catch" block will not be executed, as "Try" did not return an error.
Now let's try a file that doesn't exist. This gives us a second script in which we simply change the name of the file assigned to the "$File" variable.
- Script TryCatch2.ps1 :
$File = "C:WindowsSystem32driversetcmonfichier"
try
{
 $FileContent = Get-Content $File
 Write-Host -ForegroundColor Green "Recovered file content ($File)"
}
catch
{
 Write-Host "Warning, the file $File cannot be found!" -ForegroundColor Red
}
If you run this script, you'll get a result that may not be what you expected... The error associated with "Get-Content" will be displayed in the console (the error is normal since the file doesn't exist) and the message"Contents of file retrieved...." will also be displayed.
On the other hand, there's no trace of our phrase"Attention, the file $File cannot be found!" despite the presence of the error! The "Catch" block doesn't seem to run. But why not?

When a PowerShell command or script returns an error, there are two types of error: errors that stop execution(terminating error) and errors that do not prevent the rest of the script from running(non-terminating error).
A "Try-Catch" instruction block only acts on "terminating error" type errors, and this behavior depends on two things:
- The cmdlet used in the "Try" block and the type of error it generates
- The value of the"$ErrorActionPreference" variable or the "-ErrorAction" parameter in the
To capture all errors with a Try-Catch block, we need to convert non-terminating errors (which we could call non-fatal errors) into terminating (fatal) errors. To do this, we can use the"$ErrorActionPreference" preference variable or the"-ErrorAction" parameter supported by each cmdlet.
- $ErrorActionPreference
The"$ErrorActionPreference" variable is defined within your PowerShell profile and defines the behavior to be adopted in the event of an error. By default, its value is"Continue", which means that in the event of an error, we continue executing the script. To convert all non-fatal errors into fatal errors, you would need to define :
$ErrorActionPreference = "stop
This value can be modified in the PowerShell profile to be persistent, or directly in a PowerShell console to apply only while the console is open, or in a script. If it's in the profile, it's dangerous, as it means that the parameter is specific to the local execution environment.
- -ErrorAction
Each cmdlet has a native parameter named"-ErrorAction" which allows you to specify the behavior to be adopted when an error occurs. For example, to hide the error message in the console and continue execution of the script, we would specify :
-ErrorAction SilentlyContinue
To convert non-fatal errors into fatal errors, use the "stop" value. On a complete command, this gives :
Get-Content $File -ErrorAction StopIn this way, the "Try-Catch" block will work on "Get-Content" in the event of an error, whereas it didn't in the previous example. Let's try this third piece of code (still on the non-existent file):
- Script TryCatch3.ps1 :
$File = "C:WindowsSystem32driversetcmonfichier"
try
{
 $FileContent = Get-Content $File -ErrorAction Stop
 Write-Host -ForegroundColor Green "Recovered file content ($File)"
}
catch
{
 Write-Host "Warning, the file $File cannot be found!" -ForegroundColor Red
}
In the code snippet above, you'll notice"-ErrorAction Stop" at the end of the "Get-Content" command. If I run the script, I get this:

We can see that the instruction contained in the "Catch" block has been executed! The error was caught and we were able to obtain the expected result!
B. Try-Catch: display error message
In the previous example, we decided to display a custom error message ("Warning, the file...."), but it doesn't give precise details of the exact error.
To make it more relevant, we'll see that we can capture and display the message corresponding to the error generated. We know that we can retrieve the last error message by consulting the"$Error " constant like this:
$Error[0].Exception.Message
Index [0] is important because the most recent error message is always added first, so it corresponds to index 0. If we don't specify this index number, we'll display all error messages generated during the current session or since the last reset of the "$Error" constant (which could be done with this method: $Error.Clear()).
$Error.Exception.Message
To retrieve the error message in a block of "Try-Catch" instructions, we can use this method by specifying index 0, but we can also use another syntax thanks to the current "$_" object:
$_.Exception.Message
Note: another alternative is to use"$PSItem.Exception.Message".
If we take the previous script and modify the "Catch" block, we get the "TryCatch4.ps1" script with the following content:
$File = "C:WindowsSystem32driversetcmonfichier"
try
{
$FileContent = Get-Content $File -ErrorAction Stop
Write-Host -ForegroundColor Green "Content of the recovered file ($File)"
}
catch
{
Write-Host $_.Exception.Message -ForegroundColor Red
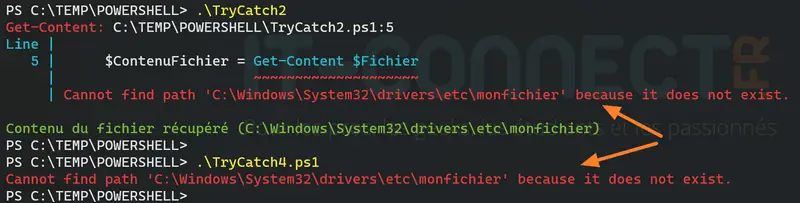
}Once this script is executed, again targeting a file that doesn't exist, we get a short but precise return in the console, since we have the precise name of the error.
Cannot find path 'C:WindowsSystem32driversetcmonfichier' because it does not exist.
If we compare the "TryCatch2" script (complete error) with the "TryCatch4" script (only the exception message), we can see that it's much cleaner:
C. Try-Catch with multiple Catch to handle different errors
A PowerShell command can return several different errors, as the cause of the error is not always the same. If we take the example of the New-Item command, which is used to create items (files, folders), an error can be generated for several reasons:
- The target drive where the file (or folder) is to be created does not exist
- The target folder where the file is to be created does not exist
- The file you are trying to create already exists
- Etc.
Thanks to a block of "Try-Catch" instructions, we'll be able to handle each error independently through several "Catch" blocks. For example, if the target folder doesn't exist, we can decide to create it, while if the file already exists, we can try to create the file with an alternative name.
To capture a specific error in a "Catch" block, let's start by retrieving the precise name of the error. To do this, we'll generate the error. Let's take the case where the drive in which we want to create the file doesn't exist. We'll run the following command:
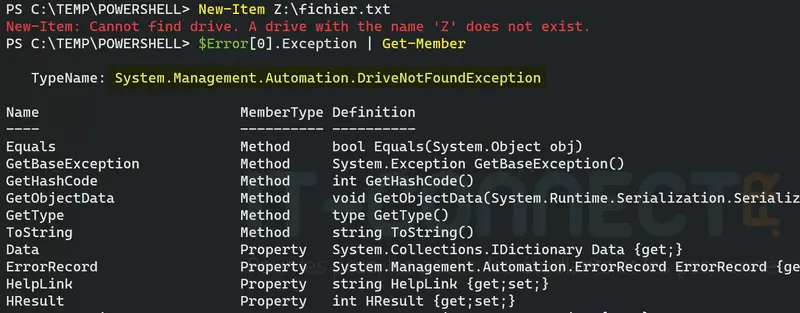
New-Item Z:fichier.txt
An error is displayed... but the console doesn't display its technical name, let's say. To do this, we need to take a closer look at the properties available for this last error, using "Get-Member". Which gives:
$Error[0].Exception | Get-Member
This will list all the properties and methods we can apply to the input command. In this case, the information we're interested in is elsewhere: it's the "TypeName" value displayed above the array of values. In this example, the error is :
System.Management.Automation.DriveNotFoundException
Another method is to retrieve the type via"GetType()" and then the associated"FullName" property in order to return only the name to the console, as follows:
$Error[0].Exception.GetType().FullName
We'll need our "Catch" block to catch the"System.Management.Automation.DriveNotFoundException" error and give it special treatment when we come across a case where the drive doesn't exist. Similarly, if we want to handle the case where the target folder doesn't exist, we'll need to handle the"System.IO.DirectoryNotFoundException" error.
Here is the code of the "TryCatch5.ps1" script with several catch blocks:
$File = "C:TEMPCATCHfichier2.txt"

try
{
 New-Item -ItemType File -Path $File -ErrorAction Stop
 Write-Host -ForegroundColor Green "File creation: $File"
}
catch  [System .Management.Automation.DriveNotFoundException]
{
 Write-Host "The drive targeted by the New-Item command does not exist" -ForegroundColor Red
}
catch  [System .IO.DirectoryNotFoundException]
{
 Write-Host "The target folder does not exist, we are restarting the creation by forcing the creation of the folder" -ForegroundColor DarkYellow
 New-Item -ItemType File -Path $File -Force -ErrorAction Stop
}
catch
{
 Write-Host $_.Exception.Message -ForegroundColor Red
}
In the code snippet above, we can see that if we want to declare several catch blocks, it's no more complicated than with just one. Nevertheless :
- Don't try to deal with the same mistake twice!
- You need to add a generic catch block at the end to handle all errors not specifically handled, but it's not mandatory if you only want to focus on a specific error.
- The space between "catch" and the error declaration "[...]" is syntactically essential.
To test this piece of code, it's quite simple: just play with the "$File" variable to generate the different types of errors we capture with our specific catch blocks (drive that doesn't exist and target folder that doesn't exist).
Here's how it looks in pictures:

D. Try-Catch-Finally example
We haven't used the optional "Finally" block yet, so that's what we'll do in this fourth example. As a reminder, the code within the "Finally" block will be executed in all cases, regardless of whether the "Try" block returns an error or not.
We'll retrieve the state of the service in the "Try" block, and in the event of an error, we'll display it via the "Catch" block. Finally, we'll use the "Finally" block to purge the contents of the"$Error" constant. We could have imagined something else, such as starting the service in question.
Following our "Try-Catch-Finally" instruction block, we'll display the contents of "$Error". Normally, the variable should be empty, as we'll be purging it within the "Finally" block. This will be an opportunity to confirm that the code contained in the "Finally" block has been executed.
Here are the contents of the TryCatch6.ps1 script:
$ServiceName = "serviceinexistent

try
{
 $StatusService = Get-Service -Name $NameService -ErrorAction Stop
 Write-Host -ForegroundColor Green "Service status correctly retrieved!"
}
catch
{
 Write-Host $_.Exception.Message -ForegroundColor Red
}
finally
{
 $Error.Clear()
}

Write-Host "Error content: $Error"
Here's what we get:

We can see that the "Finally" block has been executed successfully, since the "$Error" variable returns nothing. However, if we had written the line "$Error.Clear()" after the "Try-Catch" instruction block, without using "Finally", the result would have been the same.
IV. Conclusion
We've seen how to use a block of "Try-Catch" (or Try-Catch-Finally) instructions with PowerShell to handle errors properly and act accordingly. In a script, error handling is important to anticipate potential problems, and why not, deal with them and solve them on the fly.
Additional resource: Microsoft Learn - Try Catch Finally