www.it-connect.fr
Customizing your PowerShell profile
Table of Contents
I. Introduction
Customization of the PowerShell work environment, i.e. the PowerShell console and code editors, involves the use of a so-called profile. Each profile is represented by a file, and each user can customize their PowerShell working environment as they see fit.
The aim of this chapter is to explain how to create a profile file, where profile files are stored and to guide you through the basic customization of your PowerShell profile.
II. PowerShell profile files
First of all, you need to know that there are several different profile files. Windows PowerShell has its own profile file. So does PowerShell, and so does Windows PowerShell ISE. In each case, the profile file is represented by a file in ".ps1" format.
The profile is loaded as soon as a new PowerShell session is started. In other words, when you open a PowerShell console, your profile is loaded. This means you'll be able to execute instructions (commands) every time the PowerShell console runs.
What instructions can be specified in the PowerShell profile? Here are a few examples:
- Customize prompt to change current location to use a specific directory
- Add customized order aliases to save time when calling up your favorite orders
- Defining environment variables
- Add a message with useful information
- Add execution time for each command
- Changing the look of the console
- Etc...
Note: the Visual Studio Code editor, which we'll discover later, also has a profile file, but in a different format. It is not covered in this chapter.
III. Where is the PowerShell profile file stored?
That's a good question. The answer lies in the value of the following variable:
$PROFILEThis variable returns the path to the PowerShell profile file. Interestingly, the same file is not loaded between PowerShell and Windows PowerShell. This proves that there is a different profile between these two major versions of PowerShell.
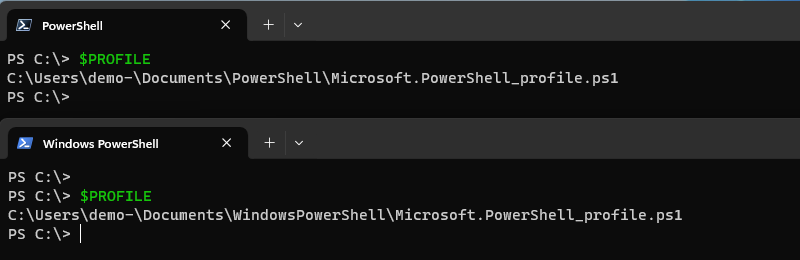
By default, these files don't exist! Since the profile is empty, PowerShell doesn't even make the effort to create it.
IV. How to create a PowerShell profile
Let's take a look at how to create a PowerShell profile file. The principle is the same for the Windows PowerShell console. Although this file can be created in a graphical interface, it's easier to do it directly in PowerShell. What's more, it's an opportunity to manipulate, so we're not going to deprive ourselves.
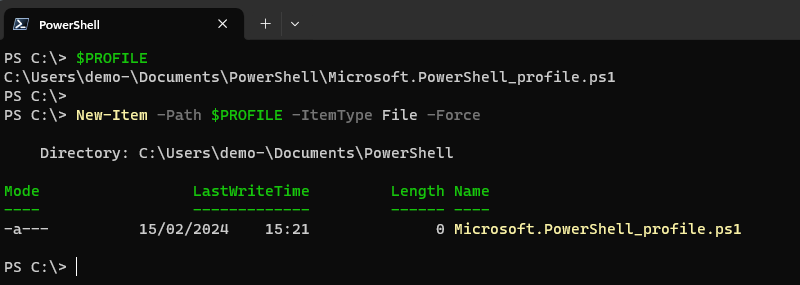
Thanks to the"New-Item" cmdlet, we'll be able to create various types of item, including files and folders. In this case, we need to create a file. We also know the path of the profile, as it corresponds to the contents of the "$PROFILE" variable.
Here is the command to create the profile file:
New-Item -Path $PROFILE -ItemType File -ForceUsing the"-Force" parameter tells PowerShell to create the file and any missing folders. This means it will create the "PowerShell" folder in "Documents", then inside it the ".ps1" file corresponding to the profile. We can see that the profile file is indeed created in the user's profile, so this file is specific to him.
We'll now look at how to customize the newly-created PowerShell profile.
V. Customizing the PowerShell profile
To edit the PowerShell profile, we can browse the machine with File Explorer until we find the file. Alternatively, we can use PowerShell to start editing with the application of our choice.
Edit the PowerShell profile in Notepad:
# Modifier le profil avec le Bloc-notes
notepad $profile
It's far from ideal for editing PowerShell code, but we haven't yet discovered PowerShell code editors: in fact, that's what we'll be focusing on in the next chapter.
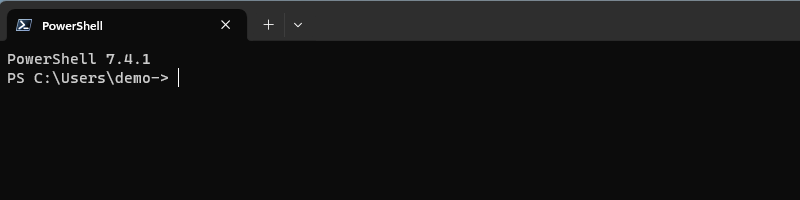
A file opens. It is empty. This is normal, since we've just created it.
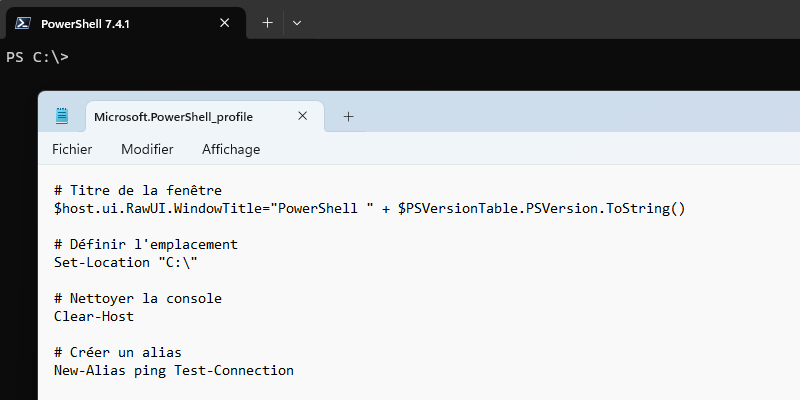
Inside, we'll add several lines for :
- Set the title of the PowerShell window to specify the PowerShell version associated with the console, so that information is available at a glance.
- Set the default location, so that the prompt is automatically positioned in "C:".
- Clean the console to eliminate any messages
- Create an alias of the "Test-Connection" command named "ping"so that using ping calls the equivalent PowerShell cmdlet rather than the ping tool itself. This makes the alias persistent , since it will be created automatically each time the console is launched!
This will give us the following lines:
# Window title
$host.ui.RawUI.WindowTitle="PowerShell " + $PSVersionTable.PSVersion.ToString()

# Define location
Set-Location "C:"

# Cleaning the console
Clear-Host

# Create an alias
New-Alias ping Test-Connection
We can see that we've been able to add a set of commands to a single file. Congratulations! Without realizing it, you've just created your first PowerShell script, even if it has a specific role.
When this is done, save the file and open a PowerShell console on your machine. Close and reopen the console each time you wish to test a modification made to the profile file.
Here is the console with the empty profile:
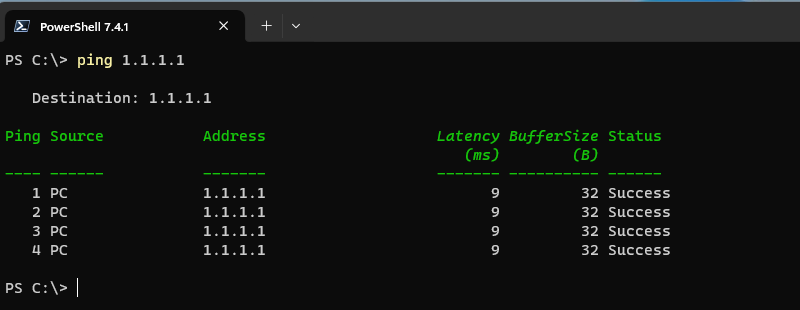
Here is the console with our new profile:
The changes are minor, but the difference is in the details. This is just an overview - you can customize the PowerShell profile as you wish.
On the other hand, if we ping any host, for example "1.1.1.1", we are indeed calling "Test-Connection" thanks to our persistent alias added to our PowerShell profile.
VI. Conclusion
Now you can customize your PowerShell console thanks to the profile file! Since the profile file is in fact a PowerShell script, you can execute any instructions you like (although be careful not to make the console launch too cumbersome).
In addition to this chapter, you can go into more detail by reading these two articles :