www.it-connect.fr

Blocky : A Lightweight Solution to Block Ads and Malicious Websites on a Network
Table of Contents
I. Introduction
Blocky presents itself as an ad-blocker and DNS proxy for the local network, enabling you to block advertising, malware and websites belonging to certain categories (pornography, social networks, etc.). Lightweight, open source and written in Go, Blocky requires few resources and can be flexibly configured thanks to a configuration file in YAML format. Would you like to find out more and learn how to configure it? Then read on.
Many Internet users want to block ads on the Internet, not least because of their intrusive nature. However, they are vital for some websites, such as IT-Connect, where they represent one of the main sources of revenue. To achieve this goal, it's possible to use what's known as an ad-blocker. It can take a number of different forms, including :
- A web browser extension such as AdBlock or uBlock Origin.
- An application available on the network that customers can use as a DNS to filter certain requests, blocking not only advertising, but also malicious sites or those belonging to certain categories.
As you can see, Blocky belongs to the second category of ad-blockers. We'll start with an overview of the solution, before moving on to its installation and configuration on Linux.
Note : Blocky can be installed on Linux, FreeBSD and even Windows. It can also be run inside a Docker container.
A. Blocky, a DNS sinkhole
We can think of Blocky as a DNS server capable of controlling and filtering queries made by devices connected to a network. It behaves like a DNS sinkhole, a well-known technique. It consists in redirecting certain DNS requests to an address controlled by the network administrator, instead of their legitimate destination, with the aim of blocking certain domains.
For example, if a machine tries to connect to a site associated with a bad reputation (malware), the DNS sinkhole can respond with an IP address such as 0.0.0.0 (or the address of an internal server) so that the connection cannot succeed. This is an effective and recognized method of protecting a network by blocking certain communications.
Here are some of Blocky's key features:
- Written in GB, Blocky is lighter than other alternatives (the binary is less than 10 MB).
- Block (or allow) DNS queries from external lists or static directives
- Manage rules by device group
- Blocking of request domain, response CNAME (thorough CNAME inspection) and response IP addresses
- Preloading and caching of queries frequently requested by customers
- Custom DNS resolution for certain domain names
- Conditional redirector function (useful for your local domain name)
- Simultaneous use of several external resolvers
- Support for various protocols: DNS (unencrypted), DNS-over-HTTPS (DoH) and DNS-over-TLS (DoT)
B. Blocky, an alternative to Pi-Hole and AdGuard
If you do a web search like "network ad-blocker", you're bound to come across two solutions: Pi-Hole and AdGuard. There are many tutorials available for installing these solutions, which in my opinion are more cumbersome than Blocky.
Compared with these two solutions, Blocky's main disadvantage - though not a major one - is its lack of a web interface. With Blocky, configuration is carried out exclusively from the command line and a global configuration file. You won't get online reports like with other solutions like Pi-Hole or AdGuard, but there is a solution on offer: integration with Prometheus and Grafana (with ready-to-use dashboards).
Blocky seems to me perfectly suited to the corporate world, thanks to its group system, its YAML configuration that shouldn't scare off system administrators, and its integration with solutions like Prometheus and Grafana.
II. Installing and configuring Blocky on Linux
A. Prerequisites
To install Blocky, you need a working Linux server (or Raspberry Pi).
You must also have Internet access and administrator rights on the machine (or access via sudo).
B. Installing Blocky (without Docker)
In this tutorial, we're going to perform a native installation. We'll download the Blocky executable from the official GitHub repository and deploy it as a system service.
Start by creating a directory in which we will host Blocky, and then access this directory :
sudo mkdir -p /opt/blocky
cd /opt/blocky
For the purposes of this tutorial, we'll be downloading the latest version, Blocky v0.25 at the time of writing. The resulting tar.gz archive will then be decompressed.
sudo wget https://github.com/0xERR0R/blocky/releases/download/v0.25/blocky_v0.25_Linux_arm64.tar.gz
sudo tar -xvf blocky_v0.25_Linux_arm64.tar.gz
You must then execute this line to authorize Blocky to listen on port 53 (DNS). Otherwise, it won't be possible due to the default restrictions on Linux.
sudo setcap CAP_NET_BIND_SERVICE=+eip /opt/blocky/blockyNext, we'll create the user account blocky associated with the /opt/blocky to associate it with a system service. Create the :
sudo useradd -d /opt/blocky blockyThen create this file to declare the :
sudo nano /etc/systemd/system/blocky.serviceCopy and paste this code into the file you've just created:
[Unit]
Description=Blocky
After=syslog.target
After=network.target

[Service]
RestartSec=2s
Type=simple
User=blocky
Group=blocky
WorkingDirectory=/opt/blocky/
ExecStart=/opt/blocky/blocky -c config.yml
Restart=always

[Install]
WantedBy=multi-user.target
The service start command is /opt/blocky/blocky -c config.ymlwhich means that Blocky loads the configuration file config.yml on startup. So, before launching Blocky, we need to configure it...
C. Blocky configuration
Blocky uses blocking lists to prevent access to malicious domains and advertisements. You can add several recognized lists, such as Steven Black's, by modifying the config.yml configuration file. Generally speaking, this file is used to configure the entire solution. In addition to this tutorial, you can consult the Blocky documentation, which is very detailed.
Note : Blocky can manage blocking lists and/or authorization lists, depending on your needs.
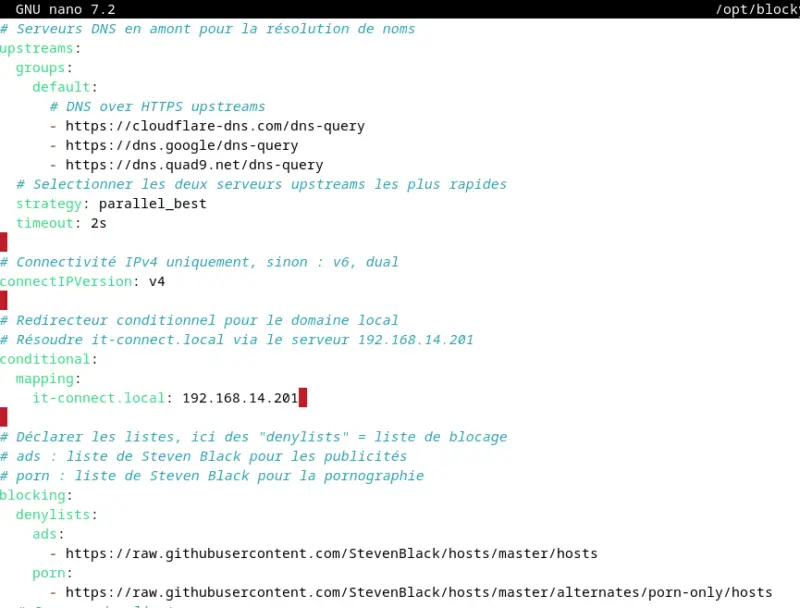
Below is the proposed configuration for this tutorial:
# Upstream DNS servers for name resolution
upstreams:
  groups:
    default:
      # DNS over HTTPS upstreams
      - https://cloudflare-dns.com/dns-query
      - https://dns.google/dns-query
      - https://dns.quad9.net/dns-query
  # Select the two fastest upstream servers
  strategy: parallel_best
  timeout: 2s

# IPv4 connectivity only, otherwise: v6, dual
connectIPVersion: v4

# Conditional redirector for local domain
# Solve it-connect.local via server 192.168.14.201
conditional:
  mapping:
    it-connect.local: 192.168.14.201

# Declare lists, here "denylists" = blocking list
# ads: Steven Black's list of ads
# porn: Steven Black's porn list
blocking:
  denylists:
    ads:
      - https://raw.githubusercontent.com/StevenBlack/hosts/master/hosts
    porn:
      - https://raw.githubusercontent.com/StevenBlack/hosts/master/alternates/porn-only/hosts
  # Client groups
  # Default group, apply "ads" list
  # Group with IP address 192.168.14.100, apply "ads" and "porn" lists
  clientGroupsBlock:
    default:
      - ads
    192.168.14.100:
      - ads
      - porn
  # Block by returning 0.0.0.0 as IP
  blockType: zeroIp
  blockTTL: 1m
  loading:
    refreshPeriod: 6h
    downloads:
      timeout: 60s
      attempts: 5
      cooldown: 10s
    concurrency: 16
    # Responding to DNS requests from startup
    strategy: fast
    maxErrorsPerSource: 5

# Preloading popular DNS queries
# For 24 hours (prefectExpires), from 3 queries on a name (prefectTheshold)
# maxItemsCount - Limit cached items to 1000 (useful for limiting RAM consumption, otherwise 0 for unlimited)
# prefetchMaxItemsCount - Limit to 1000 items to be preloaded ("hot" requests)
caching:
  maxItemsCount: 1000
  prefetching: true
  prefetchExpires: 24h
  prefetchThreshold: 3
  prefetchMaxItemsCount: 1000

# Resolve upstream server names
bootstrapDns:
  - https://8.8.8.8/dns-query

# Create a log file for each customer
# Keep data for 31 days
queryLog:
  type: csv-client
  logRetentionDays: 31

# Blocky service log
# Log errors only, default is "info".
log:
  level: error
Save and close the file.
Note : Blocky will update list data periodically. By default, every 4 hours. You can adjust this behavior via the refreshPeriod directive. You can also disable this feature, by setting this directive to 0.
In this configuration, keep these important points in mind:
- Resolve DNS names using the DNS-over-HTTPS protocol with servers declared under
upstreams. - Block ads + malware for all customers using data from Steven Black's list
- Block ads + malware + porn sites only for client with IP address 192.168.14.100 (you can specify a network address)
- One log file per customer will be generated, containing all the customer's DNS requests, rotated over 31 days.
There are many lists on the Internet, more or less complete, and more or less specific. Those of the Steven Black repository have an excellent reputation, and there are different lists, notably with categories (gambling, social networks, etc.). Here, I'm using the main list to block ads and malware, and the pornography-only list for a specific machine.
Note : Blocky's reliance on a single configuration file makes it easy to back up and restore the application. However, it is possible to configure Blocky to read multiple YAML files.
D. Start Blocky
We need to finalize the configuration to launch and test Blocky. Change the permissions on the /opt/blocky so that the user blocky owner.
sudo chown -R blocky:blocky /opt/blockyThen enable the service to start automatically and run it:
sudo systemctl enable blocky
sudo systemctl start blocky
Check the status with the following command:
sudo systemctl status blockyYou should see lines similar to these:
INFO server: UDP server is up and running on address :53
INFO server: TCP server is up and running on address :53
INFO list_cache: import succeeded count=75409 source=https://raw.githubusercontent.com/StevenBlack/hosts/master/alternates/po>
INFO list_cache: group import finished group=porn total_count=75409
INFO list_cache: import succeeded count=132370 source=https://raw.githubusercontent.com/StevenBlack/hosts/master/hosts
INFO list_cache: group import finished group=ads total_count=132368
Your Blocky instance is online! All you have to do is test it!
III. Using Blocky on a PC
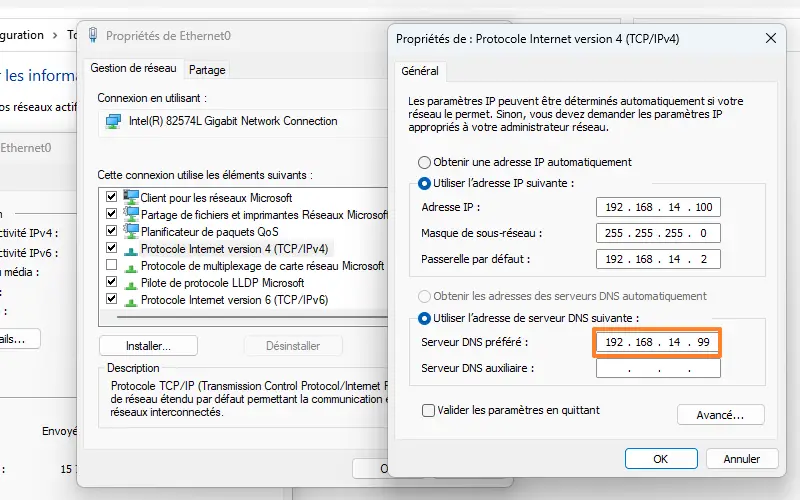
For a client machine to perform name resolution via Blocky, you need to change the network card configuration. Well, that's not quite true, as it depends on the deployment mode.
- When Blocky is used as a classic DNS server, you need to specify the IP address of the Blocky server in the machine's network card settings (or modify the configuration of your DHCP server, whether it's a box, firewall or other).
- When Blocky is used as a DNS-over-HTTPS server, it must be configured in the Windows 11 settings and/or directly in the settings of the Web browser you're using.
This second use case is not covered in this tutorial. It requires a domain name and certificate, which can be useful if you want to use your Blocky server from anywhere. If you only want to use your Blocky server from the local network or via a VPN, traditional DNS queries may suffice (bearing in mind that they are transmitted in the clear, as is the behavior of DNS). As a reminder, DNS-over-HTTPS has the advantage of encapsulating DNS requests in HTTPS traffic, so they are encrypted.
So, on a Windows machine, all you need to do is specify the IP address of the Blocky server as DNS. This is a test, otherwise it would be preferable to modify the DHCP configuration to distribute this IP address as DNS.
Then it's time to surf the Web to test the filtering...
For its part, Blocky created a file named 2025-03-17_192_168_14_100.log corresponding to the machine's logs with the IP address 192.168.14.100.
In this log, we can see all DNS requests made by this machine. For example, when accessing IT-Connect :
RESOLVED (https://cloudflare-dns.com/dns-query) www.it-connect.fr. CNAME (www.it-connect.fr.cdn.cloudflare.net.), A (172.67.207.30), A (104.21.22.214) NOERROR RESOLVED A srv-dnsThen, when there is a block on a domain related to advertising:
BLOCKED (ads) securepubads.g.doubleclick.net. NXDOMAIN BLOCKED HTTPS srv-dnsAnd finally, when a DNS request is made to resolve a name in the it-connect.local. Here, the DNS server declared in the conditional redirector rule has been called.
CONDITIONAL srv-adds-01.it-connect.local. A (192.168.14.201) NOERROR CONDITIONAL A srv-dnsIf you try to access a pornographic website from the machine with the IP address 192.168.14.100address, access is blocked.

Our Blocky works great!
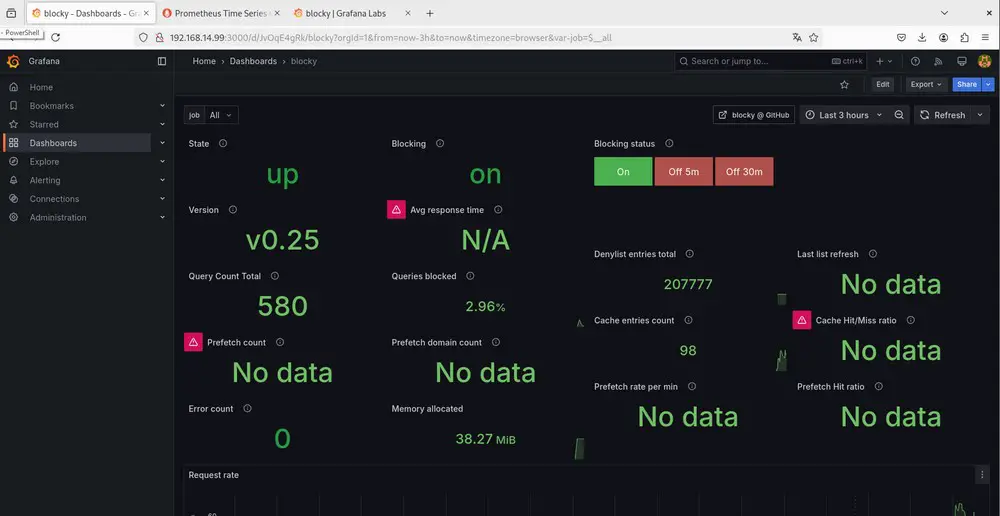
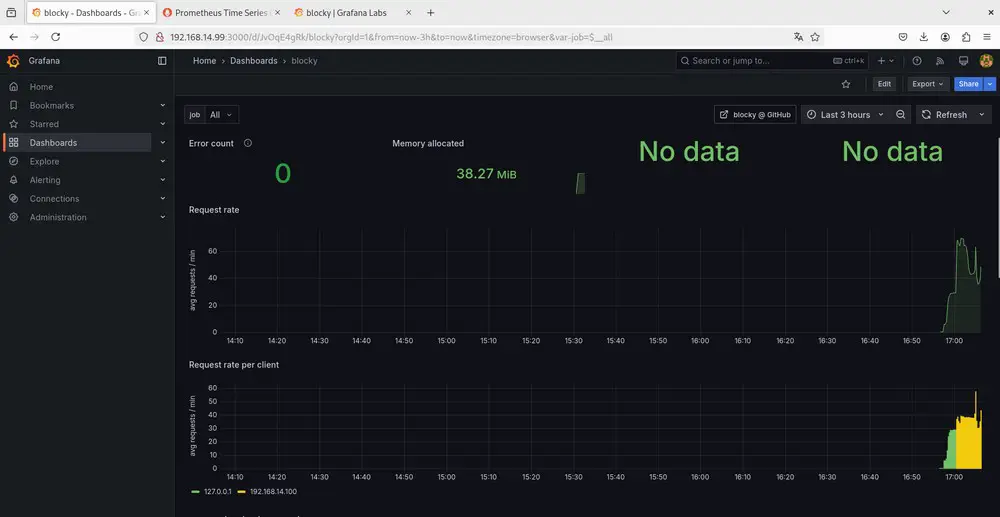
IV. Integrating Blocky with Grafana
You can deploy Grafana and Prometheus specifically for Blocky if you want a dashboard and some statistics. Alternatively, and more interestingly, you can connect Blocky to your existing installation, since Grafana and Prometheus are widely used by businesses.
To enable Prometheus to collect information from your Blocky instance, which will then be read by Grafana, you need to adjust the Blocky configuration. In the config.ymladd these lines:
# Prometheus
prometheus:
enable: true
path: /metrics
ports:
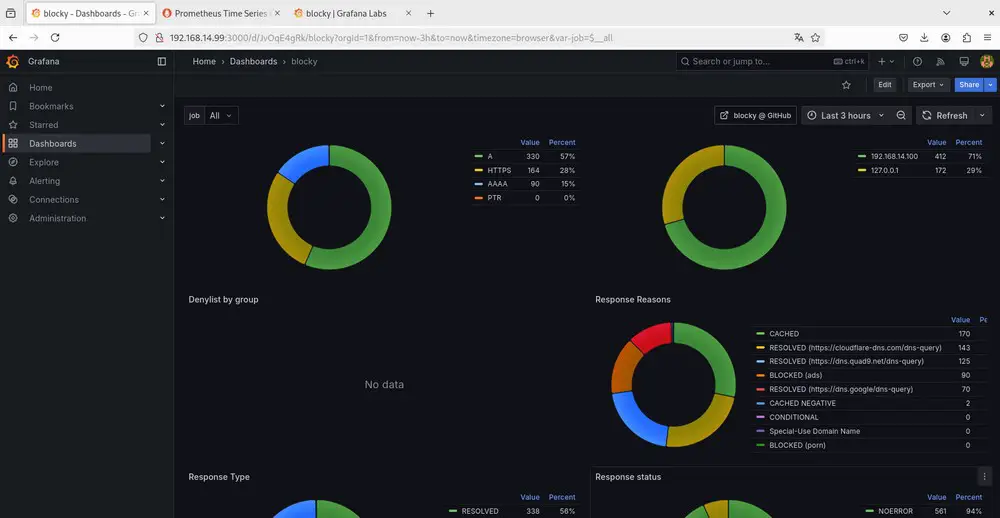
http: 4000On this page you can retrieve the Grafana dashboard template for Blocky.
Here's a look at Blocky's dashboard on Grafana:
V. Conclusion
Blocky is easy to deploy and configure, except that you may need to spend a little time studying how the configuration works. If you prefer to deploy with Docker, you can refer to the official documentation.
Even if you're not planning to block ads at network level, you can use Blocky to block malicious sites at DNS level. If this is your sole objective, you can also dispense with a solution like this one and opt directly for a DNS that performs filtering. We talked about this in this tutorial :
What do you think?