www.it-connect.fr
Active Directory – How do I configure LDAPS with a self-signed certificate ?
Table of Contents
- I. Introduction
- II. LDAPS with a self-signed certificate: who and why ?
- III. Creating a self-signed certificate for LDAPS
- IV. Exporting the self-signed certificate
- V. Copy the certificate to the trusted CA store
- VI. Importing the PFX certificate on a domain controller
- VII. Testing the LDAPS connection
- VIII. Conclusion
I. Introduction
In this tutorial, we'll show you how to switch from LDAP to LDAPS in an Active Directory environment, using a self-signed certificate. This method has the advantage of not requiring a certification authority.
To secure LDAP flows in a Microsoft environment, several solutions are available to administrators. The option recommended by Microsoft for securing exchanges between domain controllers and Windows machines is the use of LDAPS Signing (the subject of another tutorial), or LDAP signature if you prefer. Another available option is the one mentioned in this article: LDAPS (LDAP over SSL). This is particularly useful for securing connections between certain services/applications and the Active Directory.
Regardless of the method used, the aim is to secure LDAP communications between client and server. In this case, with LDAPS, a self-signed SSL/TLS certificate will be used to encrypt data exchanges, offering increased protection against certain attacks, including man-in-the-middle attacks.
If you're using Windows 10 and/or Windows 11 machines, and want to secure LDAP connections, you don't need to implement LDAPS. In fact, it's better to force the activation of LDAP Signing.
Here's a concrete example of how LDAPS can be used: you're running an application, and you'd like to implement LDAP authentication so that users can log in with their Active Directory account. Rather than using a simple LDAP connection, you can switch to LDAPS to add an important layer of security to this connection. In a future tutorial, we'll take the example of the GLPI application, as this is a very frequent use case.
II. LDAPS with a self-signed certificate: who and why ?
In an Active Directory environment, there are two ways to implement LDAPS:
- Use a TLS certificate obtained from an enterprise certification authority. For example, with an Active Directory certification authority managed via the ADCS role.
- Use a TLS certificate created on the server and self-signed, i.e. not issued by a certification authority.
The advantage of the method presented in this article is that it doesn't require the implementation of an Active Directory certification authority (also known as "PKI"). So, without even installing ADCS (or an equivalent), you can secure LDAP connections by switching to LDAPS.
This method is advantageous for organizations lacking the technical and human resources to implement, administer and maintain a certification authority.
For the rest of the tutorial, we'll assume that you already have a working Active Directory server, as well as a server or workstation that's a member of the domain for connection testing.
III. Creating a self-signed certificate for LDAPS
The first step is to create the self-signed certificate. Throughout this procedure, we'll be prioritizing the use of PowerShell for greater efficiency and automated configuration. The machine from which you are executing the commands must have PowerShell's ActiveDirectory module installed (this is the case on a domain controller).
Note : I recommend that you copy and paste all the lines of PowerShell code and insert them into the same script, to ensure that it runs smoothly. This is because the same variables are used throughout the procedure, and there is a link between the different steps. In addition, run these commands on a domain controller, either locally or via a PSRemoting session.
You need to create the self-signed certificate with the Active Directory domain name (DNS name) as "subject" and the DNS names of the DCs as "DnsName", in addition to the domain name.
The commands below will perform this action, creating a certificate valid for 1 year. You don't need to modify the code below, it will automatically retrieve the values corresponding to your domain.
# List of all DCs in the current domain and domain root
$ListOfDC = (Get-ADDomainController -Filter *).Hostname
$ListOfDC += $((Get-ADDomain).DNSroot)

# Certificate validity period (1 year)
$ExpirationDate = (Get-Date).AddYears(1)

# Creating a self-signed certificate
$MyLDAPSCert = New-SelfSignedCertificate -Subject $((Get-ADDomain).DNSroot) -DnsName $ListOfDC -CertStoreLocation cert:/LocalMachine/My -NotAfter $ExpirationDate
$MyLDAPSCertThumbprint = $MyLDAPSCert.Thumbprint

$MyLDAPSCert | Format-list
After executing this block of code, you should have a self-signed certificate ready for use! Information about this certificate will be displayed at the end of the command.
IV. Exporting the self-signed certificate
The second step is to export the self-signed certificate we've just created. What for? There are two answers to this question:
- Export the certificate, without the private key (in CER format), so that it can be imported on servers where there is a service or application that needs to be able to establish LDAPS connections.
- Export the certificate, along with the private key (in PFX format), so that it can be imported into other Active Directory domain controllers in the domain.
The code below will generate two output files, at the root of"C:". You can change the path if you wish by modifying the"-FilePath" parameter of the"Export-Certificate" and "Export-PfxCertificate".
# Export certificate (without private key)
Export-Certificate -Cert $MyLDAPSCert -FilePath "C:\Cert-LDAPS-$((Get-ADDomain).DNSroot)-Public.cer"

# Export certificate (PFX) for import on other DCs
# Password-protected export : $MotDePasse = ConvertTo-SecureString -String 'Password' -Force -AsPlainText
Export-PfxCertificate -Cert $MyLDAPSCert -FilePath "C:\Cert-LDAPS-$((Get-ADDomain).DNSroot).pfx" -ProtectTo $env:username
Note that the PFX certificate (second command) is protected and authorization is associated with the account used to execute the command. If you prefer, replace the "-ProtectTo" parameter with "-Password" and specify a password via a secure string.
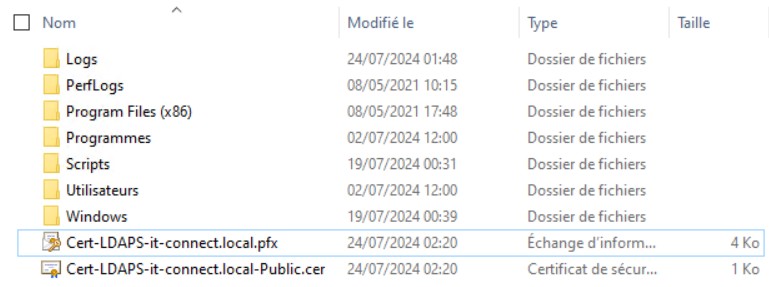
At the end, we obtain two files :
- Cert-LDAPS-it-connect.local-Public.cer
- Cert-LDAPS-it-connect.local.pfx
V. Copy the certificate to the trusted CA store
On the domain controller, the self-signed certificate we've created is stored in the "Personal" store of the certificate store. For the configuration to work, you need to copy and paste this certificate into the "Trusted Root Certification Authorities" store.
Although this can be done with a simple copy-and-paste operation using the certificate management MMC console, we'll continue with PowerShell.
Here is the code to run (no adaptation required):
# Copy the certificate from the "Personal" store to the "Root CA" store
$CertStoreCA = New-Object System.Security.Cryptography.X509Certificates.X509Store -ArgumentList "Root","LocalMachine"
$CertStoreCA.Open("ReadWrite")
$GetMyLDAPSCert = Get-ChildItem -Path "Cert:\LocalMachine\My" | Where-Object { $_.Thumbprint -eq $MyLDAPSCertThumbprint }
$CertStoreCA.Add($GetMyLDAPSCert)
$CertStoreCA.Close()
VI. Importing the PFX certificate on a domain controller
If your environment has several AD domain controllers, you need to import the certificate on each of these servers. You need to transfer the"Cert-LDAPS-it-connect.local.pfx" file to each DC and run the following command (here, the certificate has been copied to "C:"):
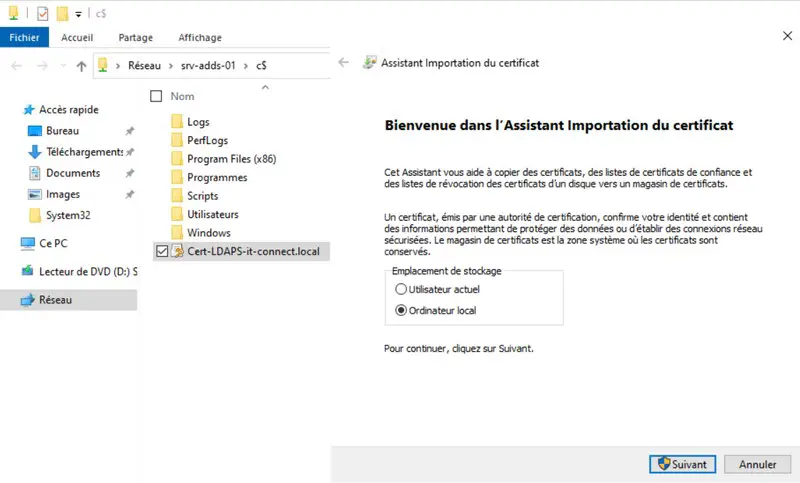
Import-PfxCertificate -CertStoreLocation Cert\:LocalMachine\my -FilePath "C:\Cert-LDAPS-it-connect.local.pfx"If you're using the graphical user interface, simply double-click on the PFX file and follow the wizard.
From now on, it's possible to attempt an LDAPS connection between two domain controllers. Alternatively, we could have run the test locally, on the first DC.
VII. Testing the LDAPS connection
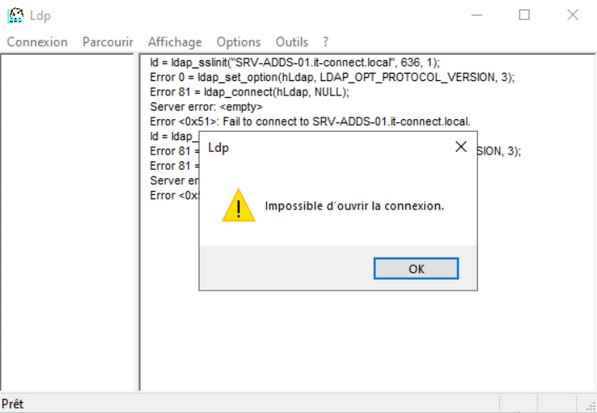
How do I test the LDAPS connection? We're going to use the "ldp.exe" tool present by default on Windows Server. If you run an LDAPS connection test before installing the certificate, you'll get an error like the one below.
Remember : the certificate must be present in the domain controller's "Trusted Root Certification Authorities" store, otherwise the connection will be rejected.
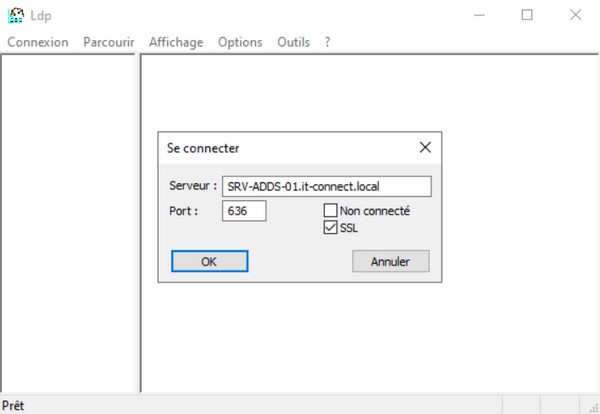
Simply search for "ldp" or "ldp.exe" in your server's search box to open this tool. Then click on "Connection" and "Connect". Fill in the form with the full DNS name of the DC server, indicate the port number "636" and check the "SSL" option. Like this:
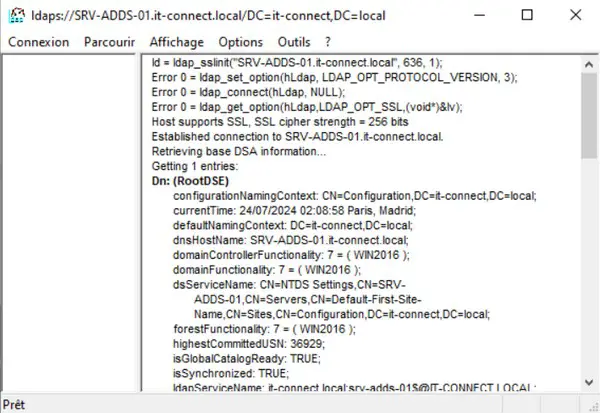
Click "OK" to run a connection test. You should obtain a result similar to the following:
VIII. Conclusion
By following this tutorial, you now have all the information you need to set aside LDAP connections in favor of LDAPS connections, without needing to implement a certification authority. Another article will deal with obtaining a certificate for LDAPS with an ADCS certification authority.